Welcome to modding for Bergsbruk! our goal has been to make this as easy as possible to add your own stuff, but remember you can only make stuff you legaly have ALL rights to (And you cant sell mods). Good Luck!
Software
Required Software:
Optional Software:
Modeling
Modeling for Bergsbruk is the same as for most games, with 2k-400k polys is recommended as anything above 400K gets tough for lowend users.
Mods in Bergsbruk are "encrypted" (not open to edit like FS) that way only the person with the mod project files can make edits, that also makes most bought models "legal" to use.
Any 3D software that support FBX export can be used but we recommend Blender.
USE THESE SCENE SETTINGS IN BLENDER! (Or the model will have the wrong scale but not show it and just behave like shit)
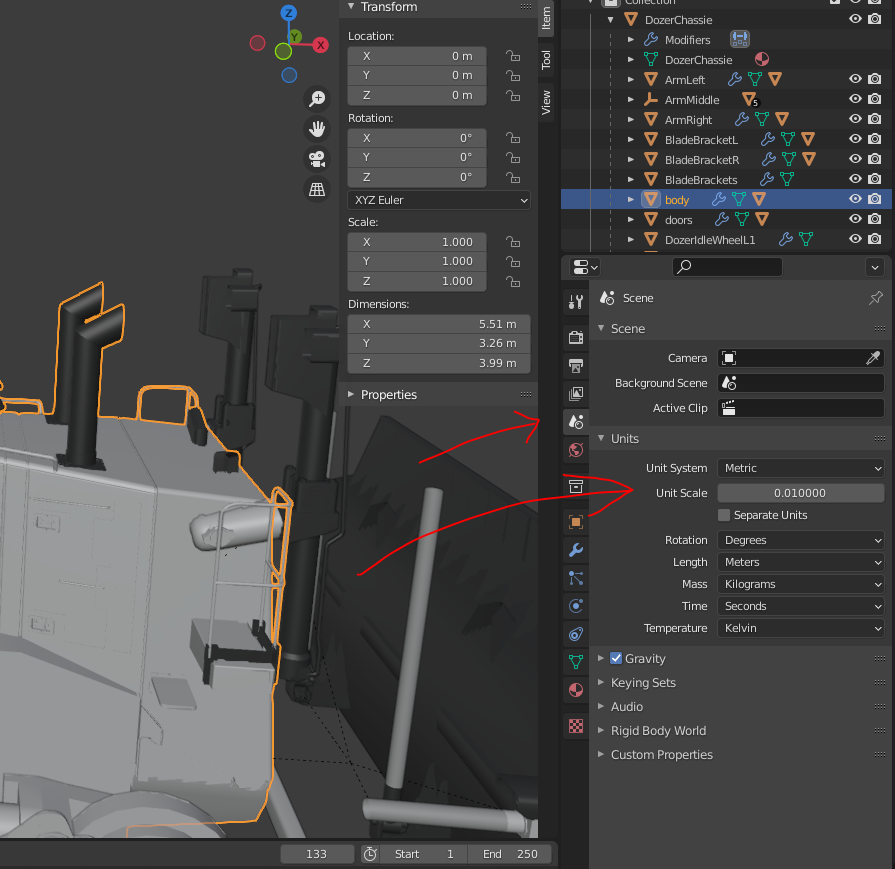
Press the "Scene properties" tab (small arrow) and change the Unit Scale to 0.01
There are 2 Types of Meshes we use,
Static Meshes: Solid objects like Wheels, trackpads, Building objects lights etc, These do not need Rigging.
Skeletal Meshes: Moving objects like a vehicle with a Crane/Arm, or a tilting bucket etc, These need Rigging to work,
Vehicles are imported to Unreal without Wheels and Tracks, You only need to import one wheel (if all wheels are identical) or one Trackpad
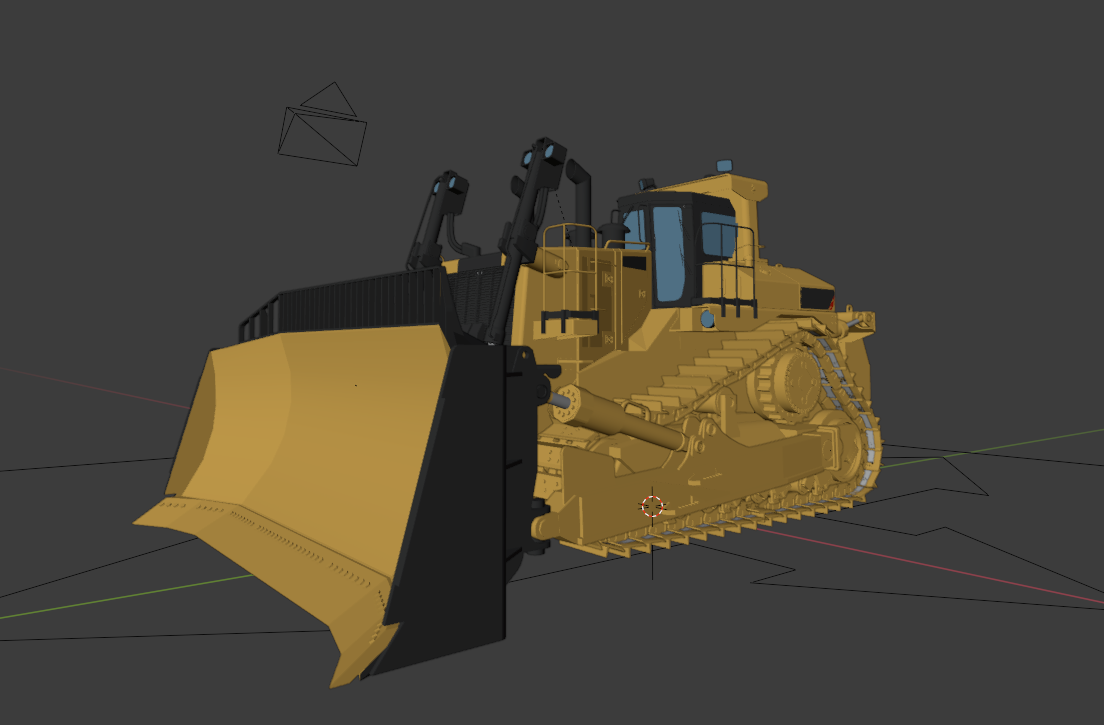
Models can be both bought and made since mods arent open to edits, This is a Dozer from Polygonish
Fillplanes & Cut Edge
All dirt moving Machinery/Attachements need 8 Fillplanes that range from 0 to 100% full and a Dirt Cut Edge that looks like the one in the pic but match the bucket or blade.
Dumpers & Trucks and other stuff that transport dirt only need 8 Fillplanes that range from 0 to 100% full
Loaders & Excavators that only have attachers do not need Fillplanes or the Dirt Cut Edge
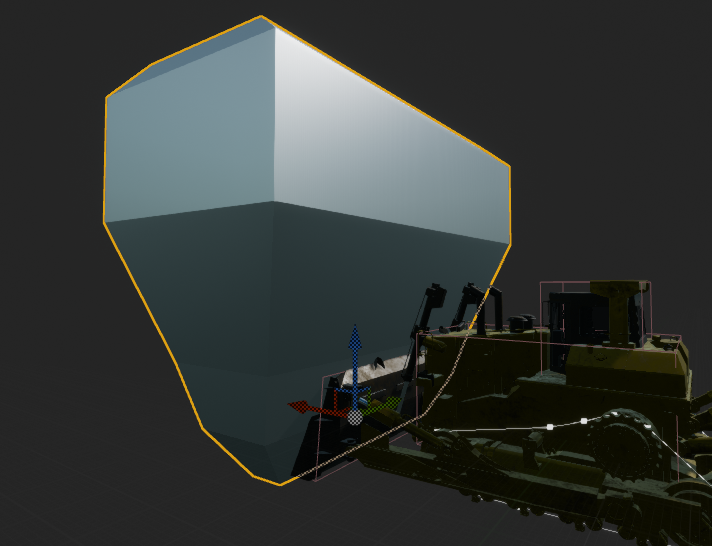
Dirt Cut Edge for the Dozer, This is the shape the blade will "cut" in the dirt, Keep the most parts angeled and do not Scale this in Unreal, even a small change makes the cut super wonky.
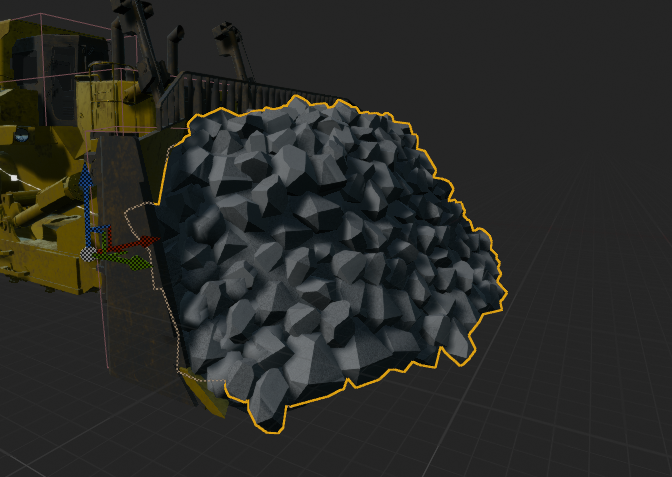
The Fillplane for the dozer, this is the 100% (full blade) one visible, Under this there are one fillplane at 10%, 20%, 30%, 40%, 50%, 60%, 80%, Making it 8 fillplanes in total.
Rigging
Rigging is done by having the chassie (where the wheels/engine are mounted) and the rest of the parts as "children" in a chain out from the Chassies
All part that just "Follow" (like hydraulic rams) Need to be at 90 Degree angles
as they need to point in the closest 90 degree direction to where they should be IRL.
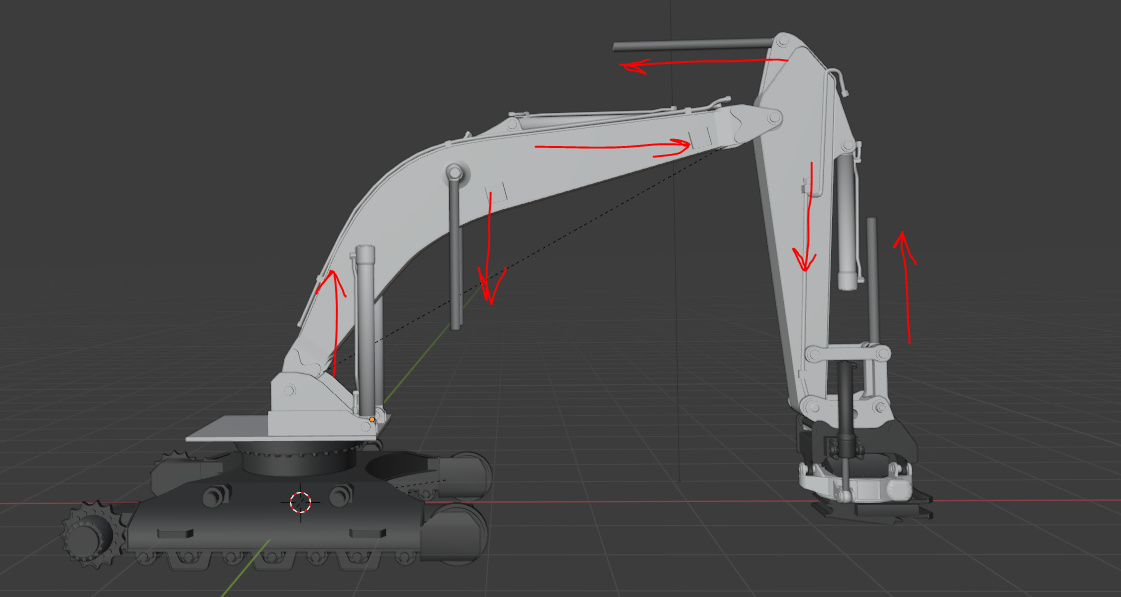
This is the correct ram direction, the closest 90 degrees to where they should be. Other pics on this wiki have them in wrong or wierd positions but this is the right way!
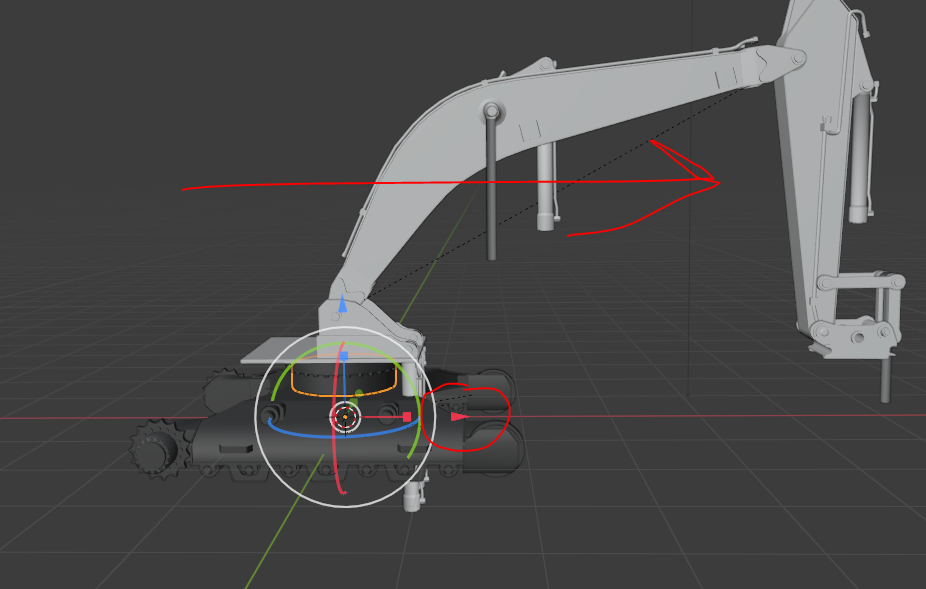
Make sure your vehicle or anything is facing this direction along the X axis (or it will be super wierd)
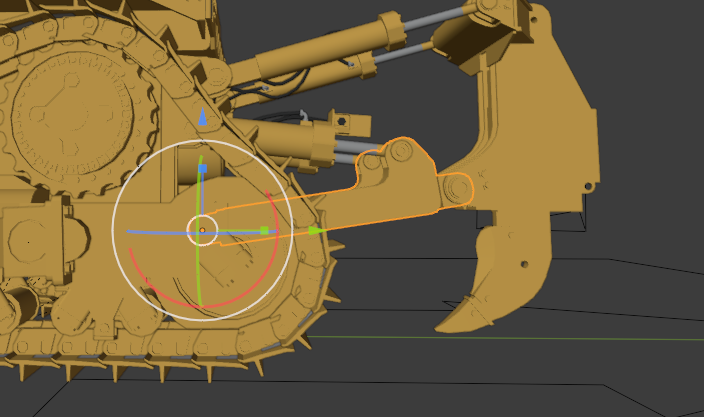
All your moving parts need to be 100% centered on the axis it should rotate/move around
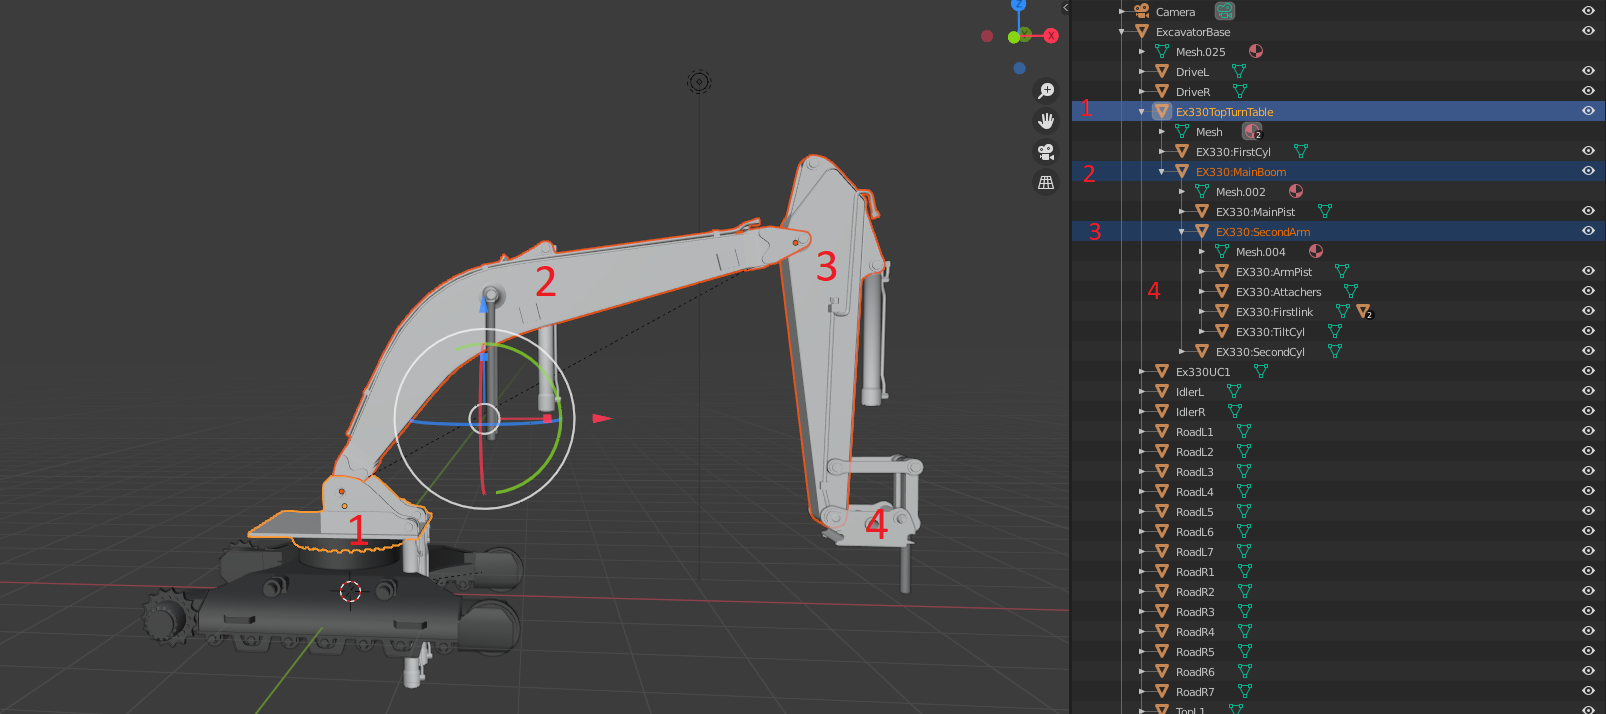
Rigging is done by having the chassie (where the wheels/engine are mounted) and the rest of the parts as "children" in a chain out from the Chassies
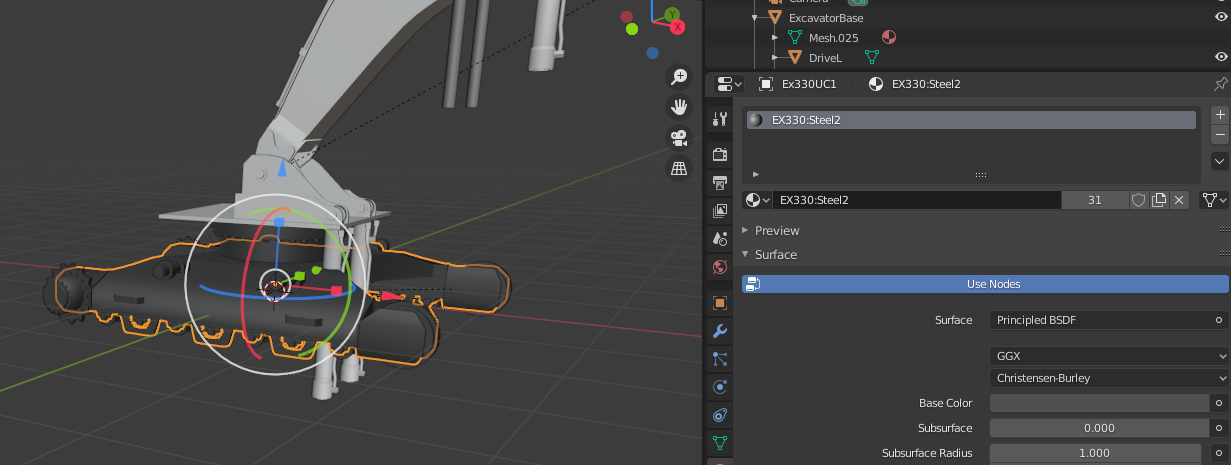
Remember to Assign materials to all parts, You need to use one material for each colour
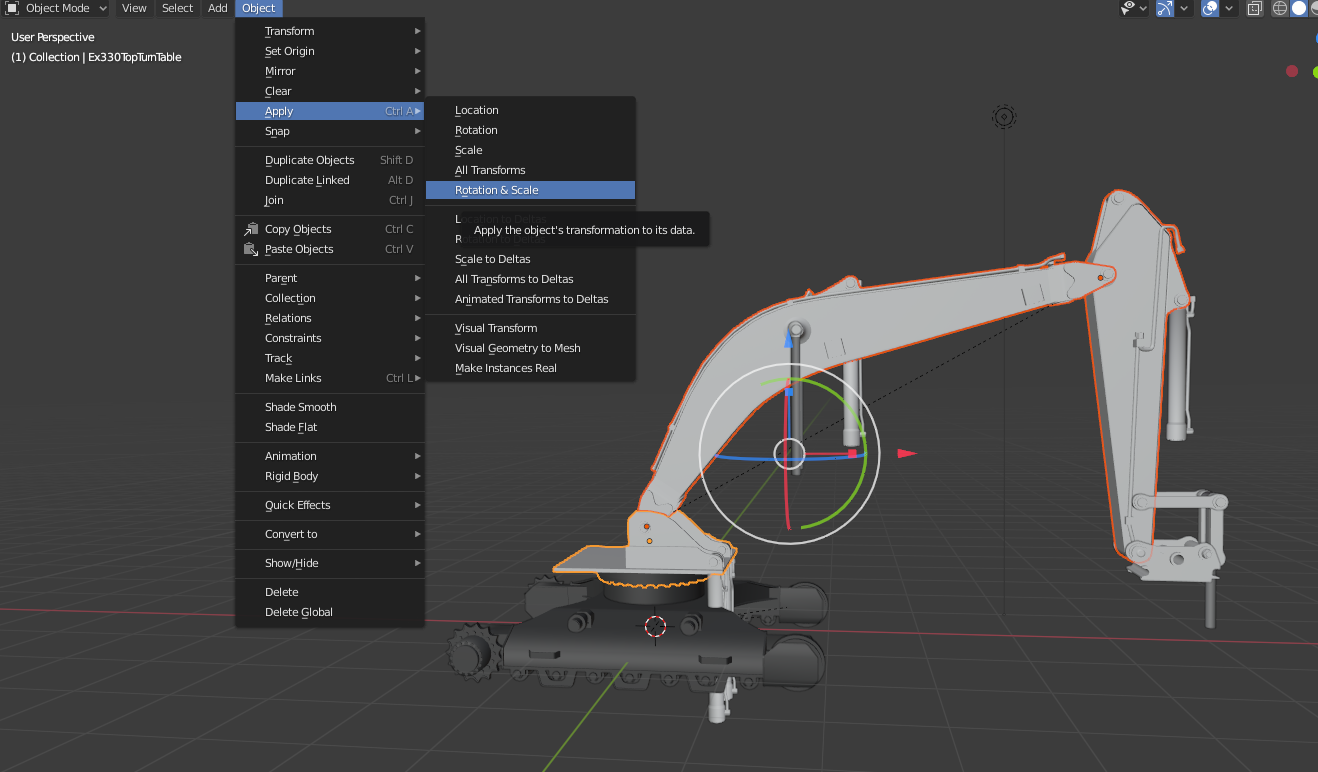
Last before Exporting remember to Apply Rotation and Scale, DO NOT APPLY LOCATION! this will f up all your centers!
Exporting
This is pretty simple, Export as Fbx to your texturing software, Bada bing bada booom almost done!
Texturing
Texturing for Bergsbruk is pretty simple, The UV mapping is the same boring thing it always been.
On the diffuse texture you only Paint Red for Wear, Green for Snow, Blue for Dirt, The machine/assets colour is in a diffrent place later on.
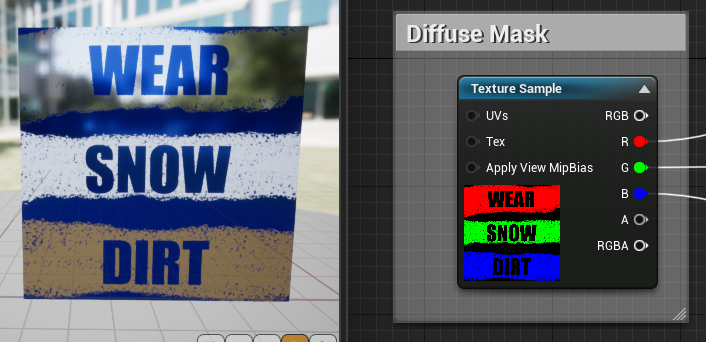
The Diffuse mask (right) gives this effect ingame (left)
The diffuse needs to have a Solid Black background behind the Red Green Blue.
The Normal map and AO are made just like in any other game,
You can NOT use any Roughness or Metallic as this changes with Wear/Snow/Dirt
You can add wear to plastic and other stuff aswell, its editable later what the wear shows.
Do not use any textures over 2048x2048 as this will cause issues,
Importing to Unreal
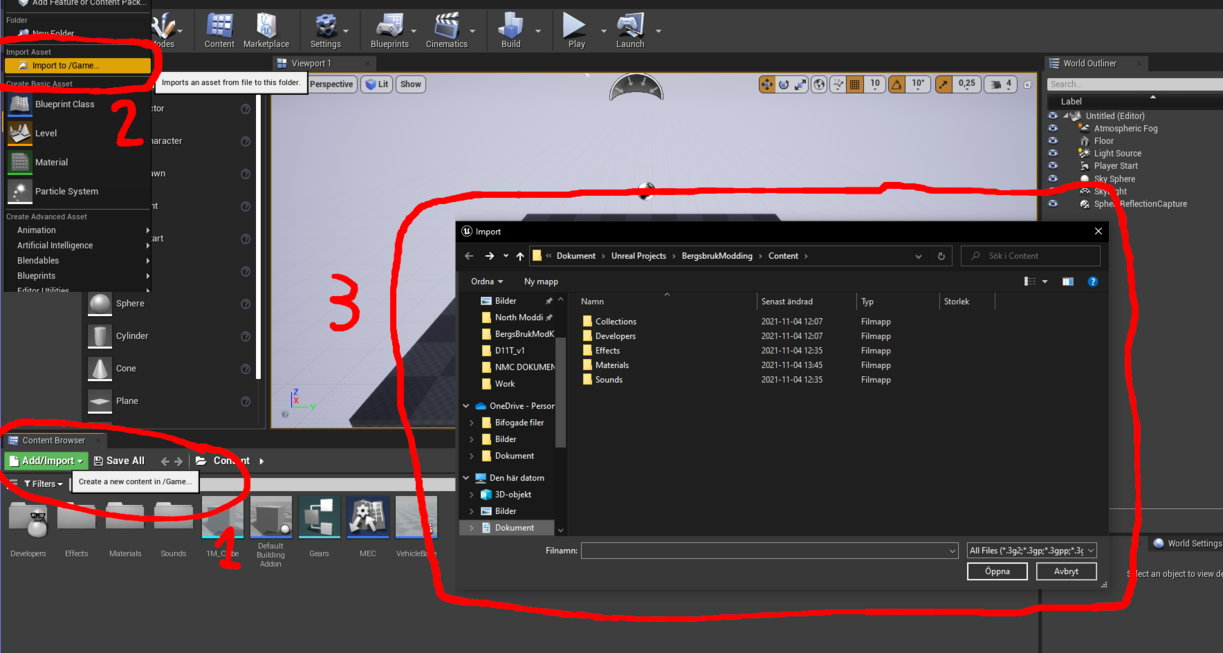
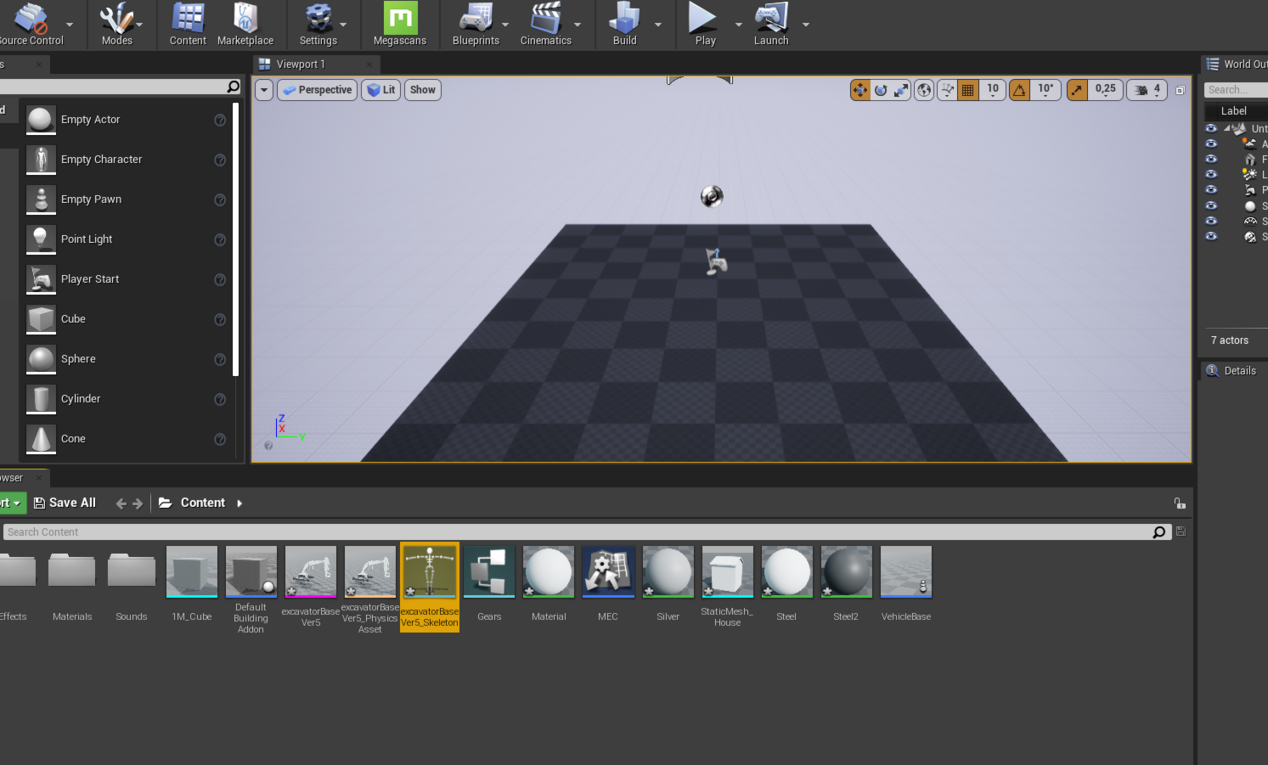
The 3 Steps to importing anything to Unreal, 1, Press Add/Import to open the menu 2, Press Import to game 3, Select the object and press enter
Static Mesh
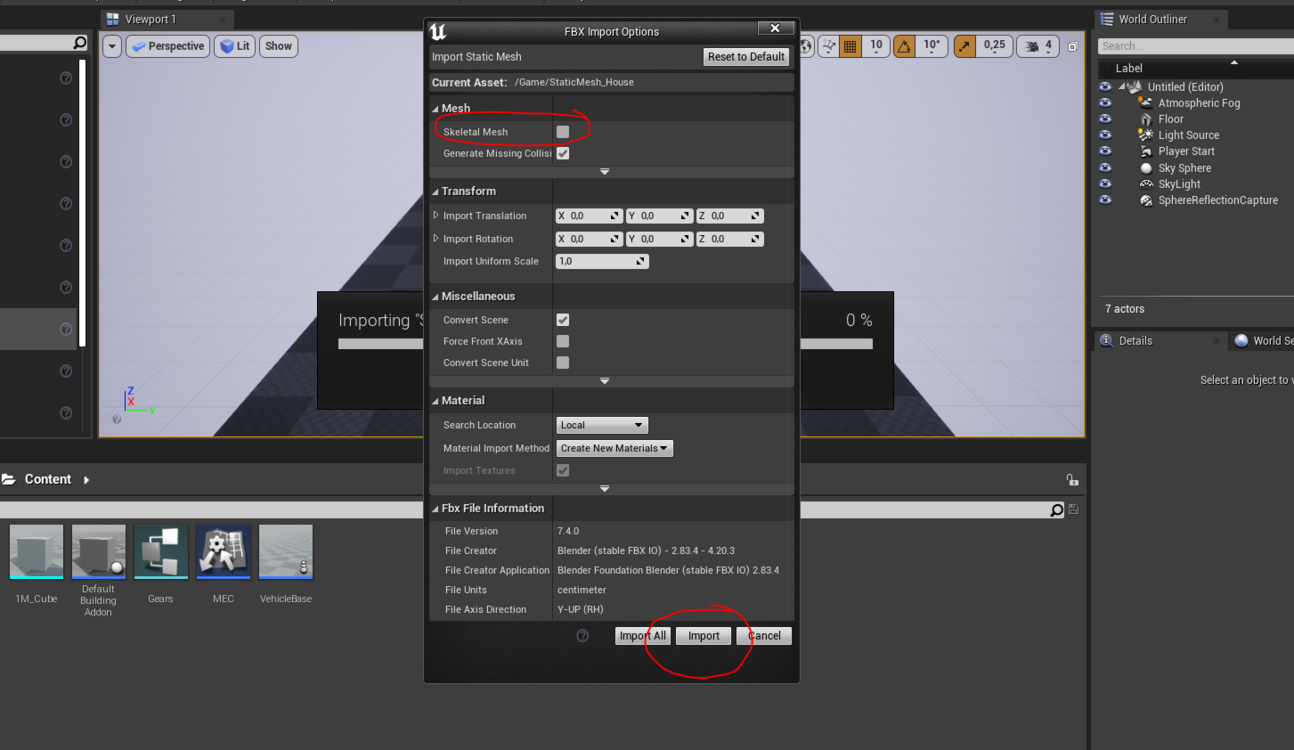
Skeletal Mesh needs to be
Unticked then you have some optional import settings but 90% its just to press
Import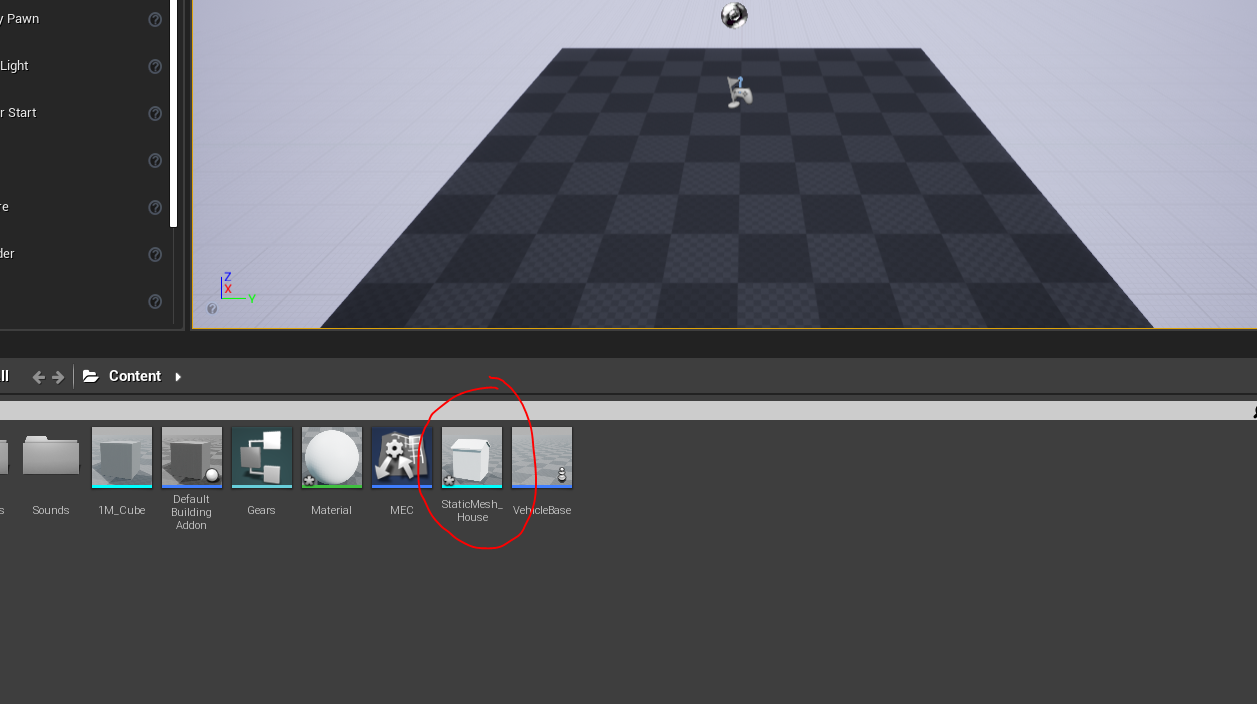
Now your mesh should appear in the Folder you imported it to, Open the mesh by double clicking on it
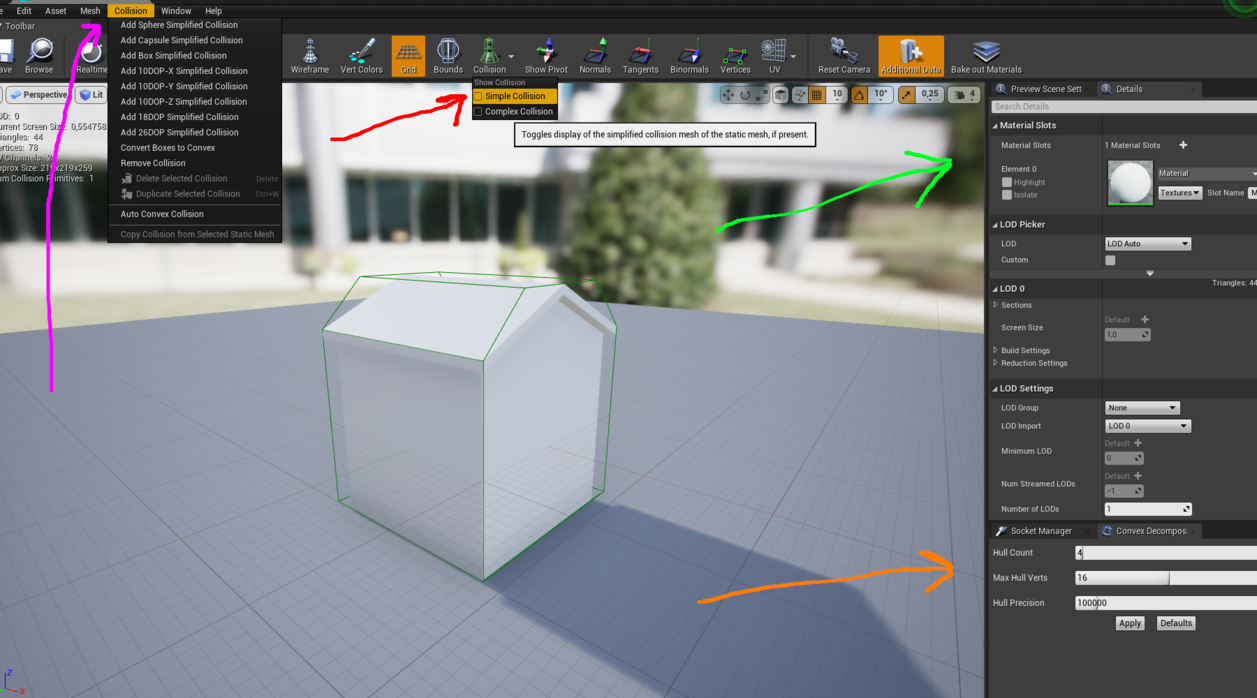
Start by making the
Collision visible by Clicking on "Collisions" above the
red arrow to get the dropdown menu and
tick the "Simple Collisions", If your not happy with the collision you can remove it and add a diffrent one with the
"Collision" menu next to the
Pink arrow, You can edit the
Convex collisions with the menu next to the
Orange arrow, Next to the
Green arrow you can change to the
materials you want on the mesh.
When importing wheels you want to use a Sphere Simplified Collision
Save & Close & Done! Mesh is imported and ready to be used!
Skeletal Mesh (Rigged)
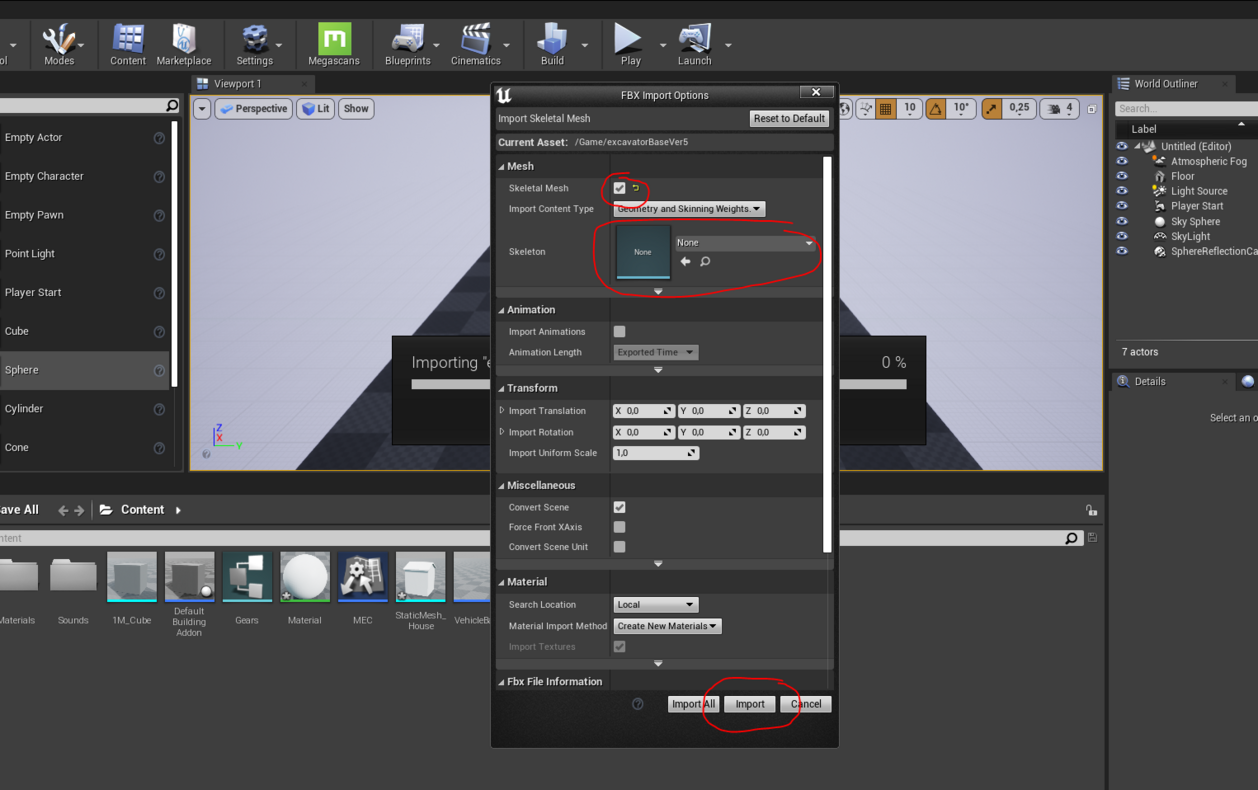
Make sure "Skeletal Mesh" is
Ticked And the "Skeleton" is "
None" then press "
import"
Save them, then open the
Skeleton asset
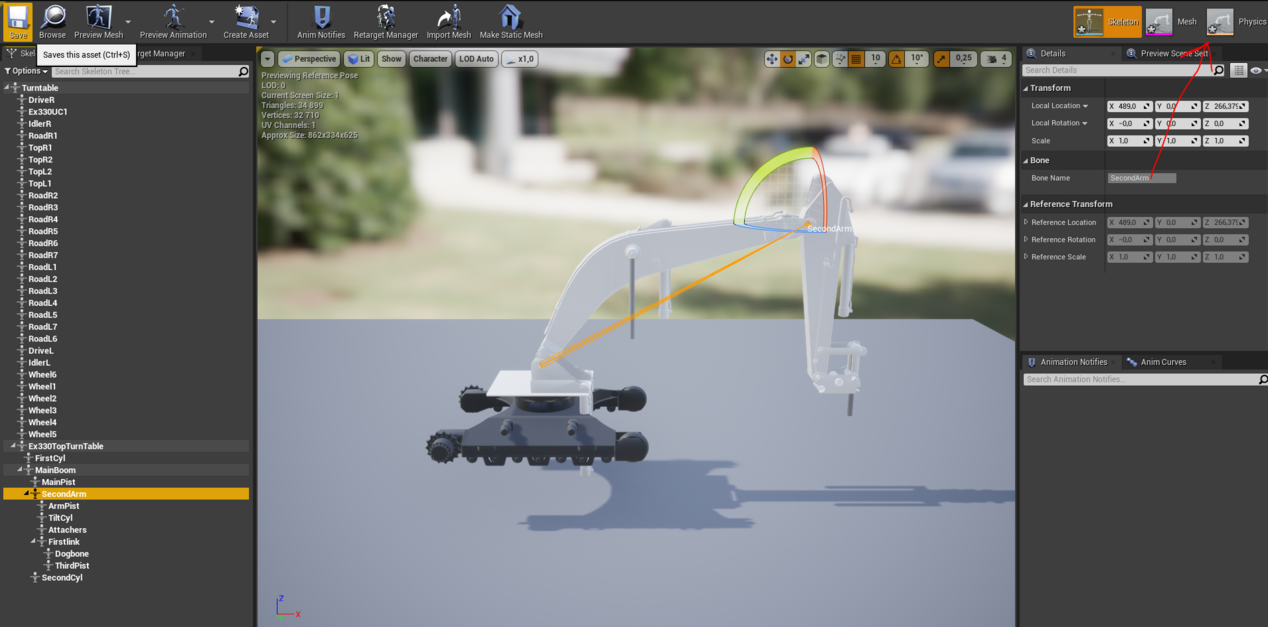
Here you can check so everything is in the right place before continuing, When your done open the "
Physics" asset (Red Arrow)

Select all Bodys and
delete them, When your done open the "
Mesh" asset (Red Arrow)
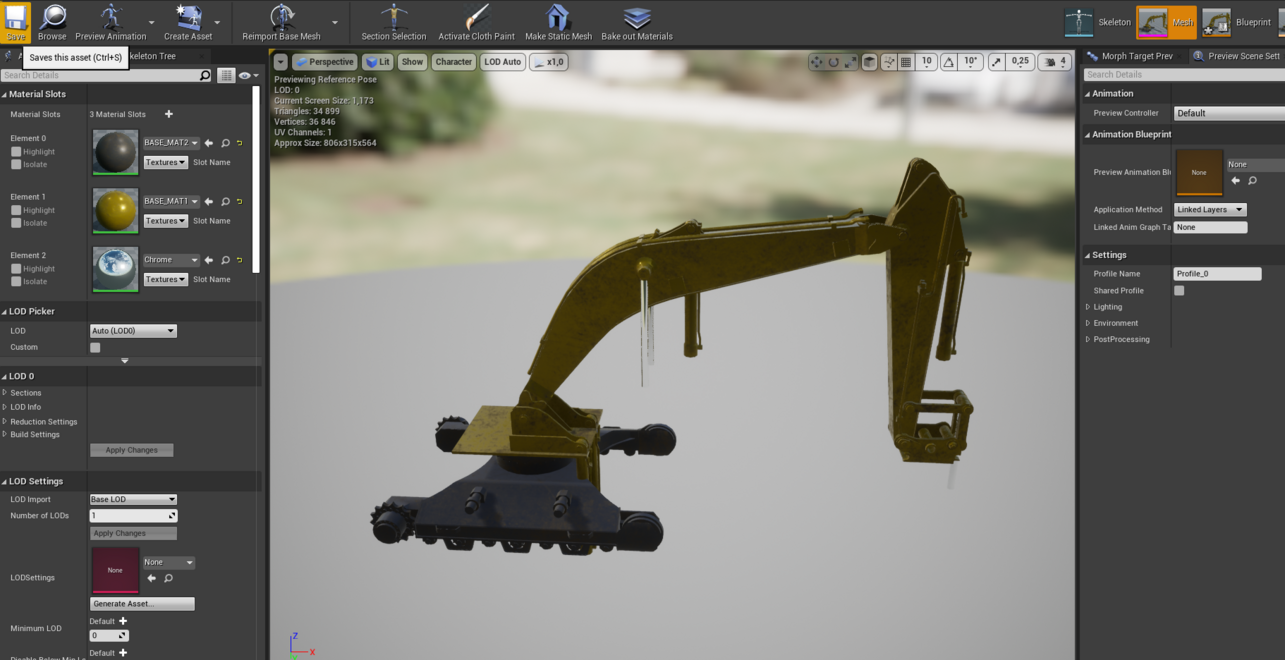
In the Asset Details you set the
materials for the Skeletal mesh
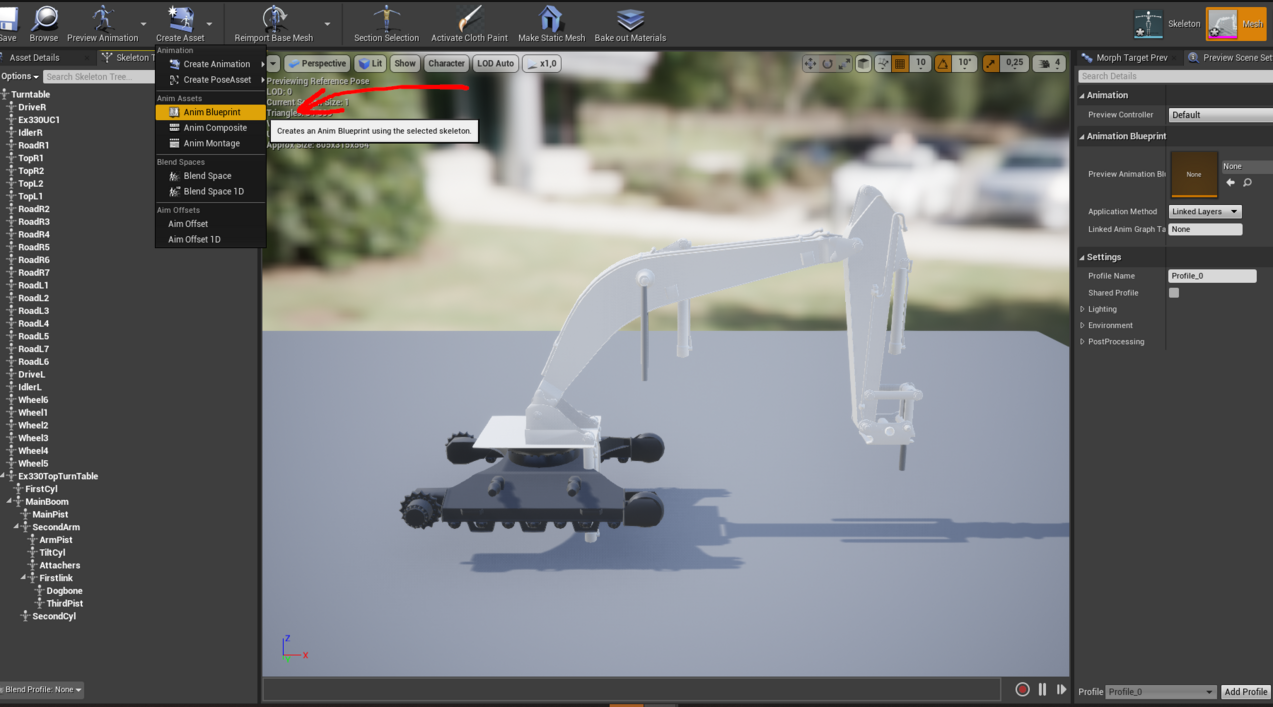
The Skeletal mesh needs a
Animation Blueprint (AnimBP), Press "Create Asset" then "Anim Blueprint"
Press
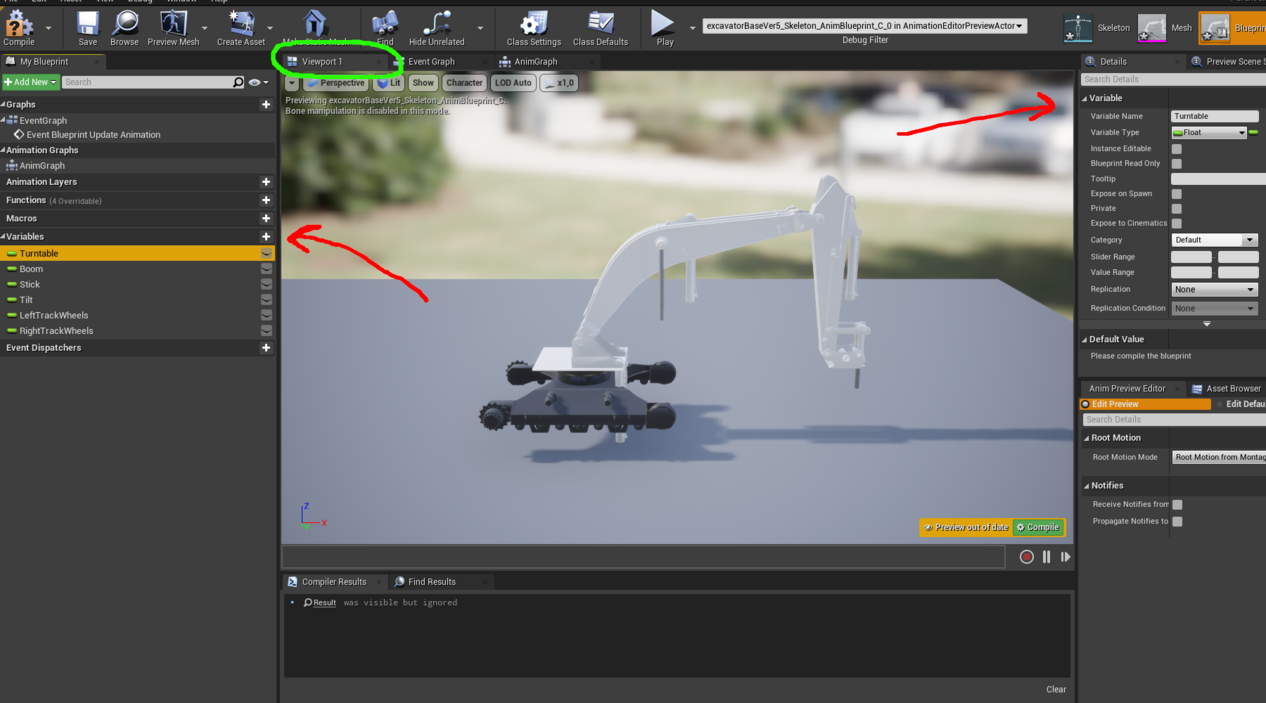
Viewport1 to see the mesh, Then you Create the
Float Variables you need for the mesh,
Press the Little + and then you
Name it and change its type to
"Float" , When your done open the "
AnimGraph"
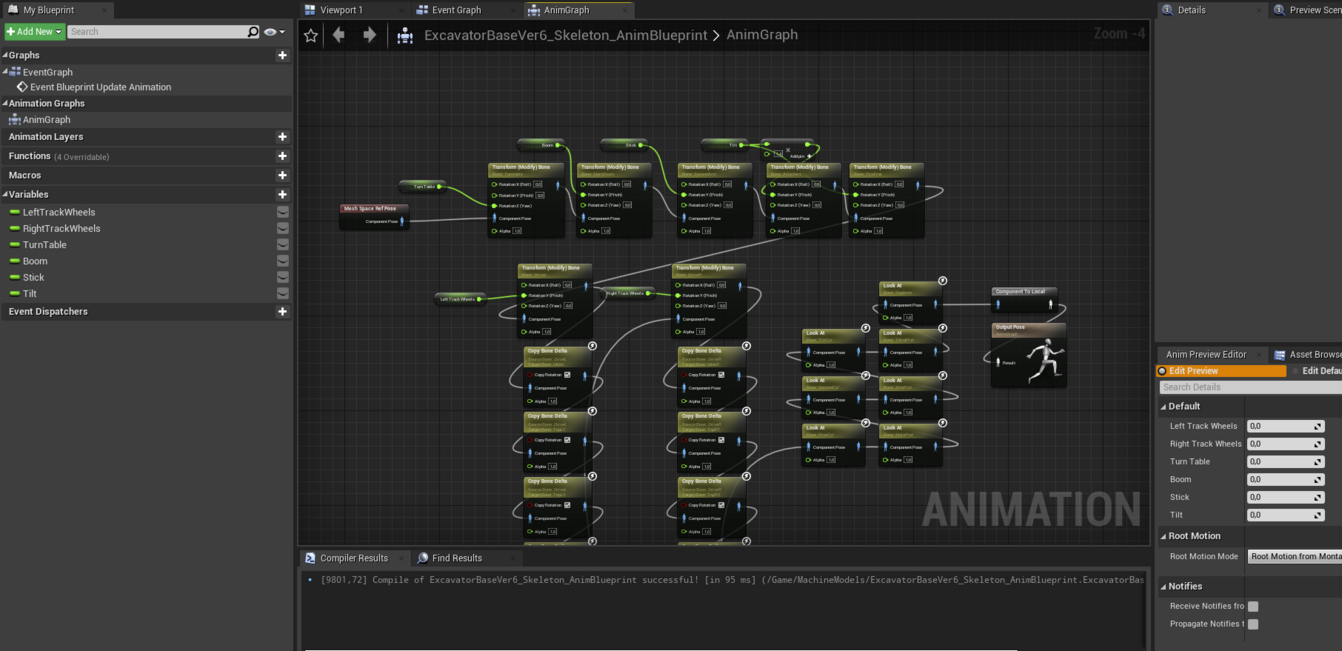
In the
AnimGraph you Rightclick, Search for "
Mesh Space Ref Pose" and from that you can connect all types of nodes (Explained in more detail below) for moving the Skeletal mesh, just make sure you
connect them all and end with the "
Output Pose" (it will create the "Component to local" automaticly)
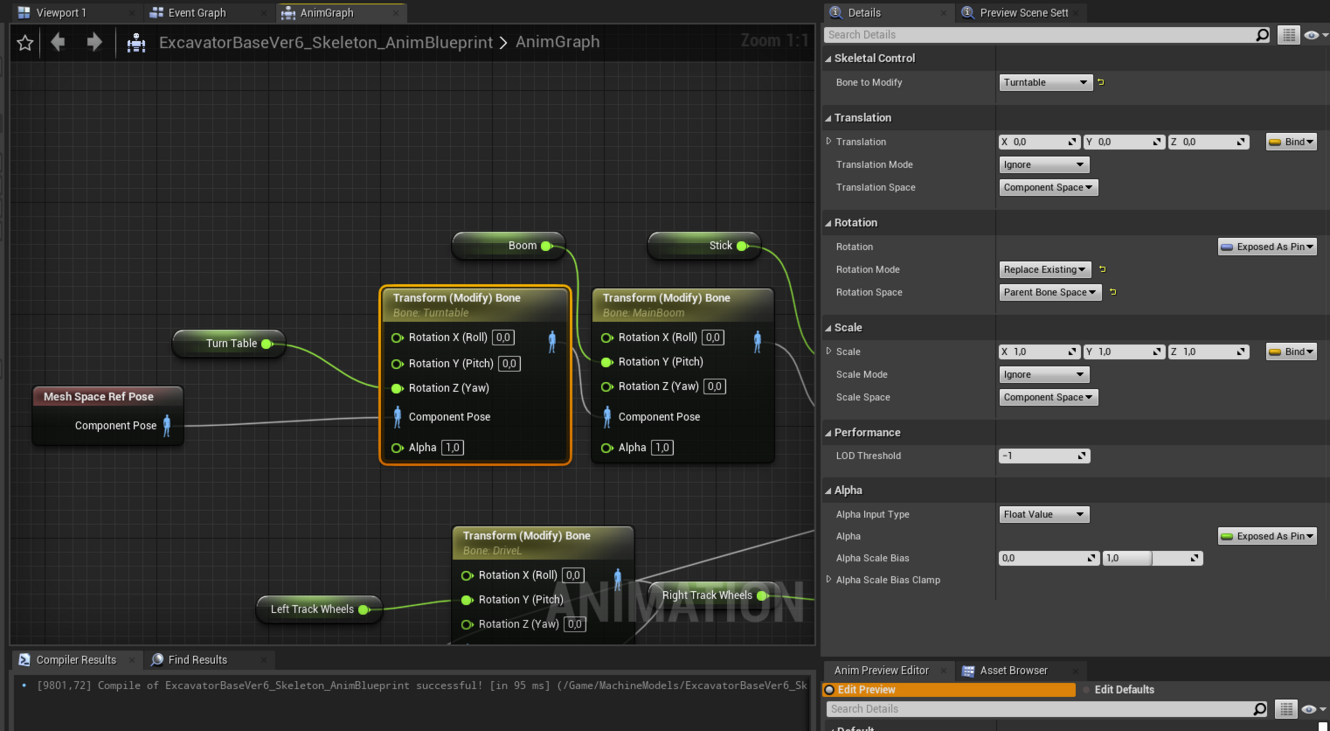
Transform is used to make bones move, Select a "Bone to Modify" and connect your variable, Compile and test in the Viewport by changing the value of the variable, (If its right and you for example change the value of "Boom" it should move the boom in the Viewport) your gonna have to play around a bit with this or look at an
example AnimBP to get the hang of it.
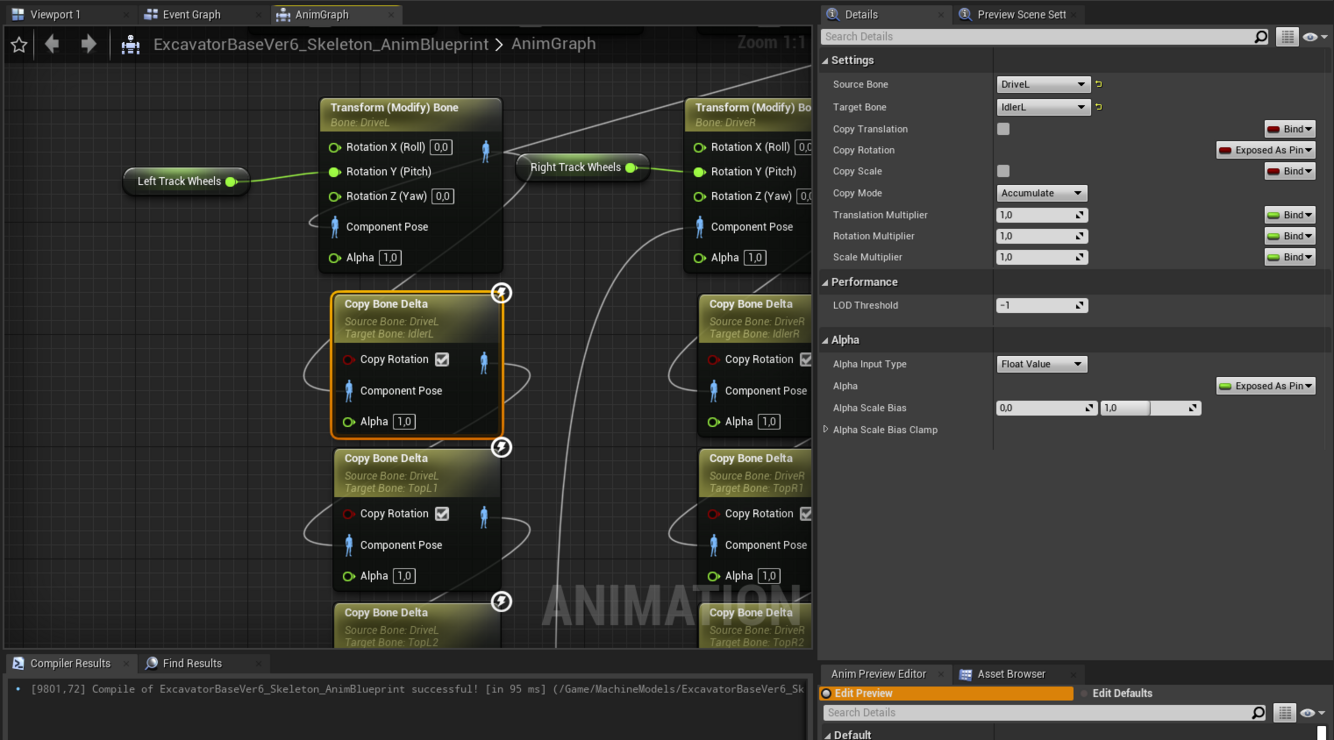
This node is used to copy the transform of another
bone, like if you have 7 under carriage wheels you only need to add rotation to the first and the rest
copy its rotation
"Look At" Node is used to make stuff line up or look at something, Most of the time we use it to make the 2 parts of a Hydraulic Ram line up, Make the
Hydraulic Ram look at the
Hydraulic Cylinder and the
Hydraulic Cylinder is made to look at the
Hydraulic Ram. Use
"look up axis", your gonna have to play around a bit with this or look at an
example AnimBP to get the hang of it.
Creating the Mod
Open the BergsbrukModding project
Find the Template or Example object closest to the thing you want to add (we will add those as we go along)
Duplicate that object and name it something like "MyModteam_BrandedDozer_Model666"
Otherwise the game might get a bit annoyed finding 7 vehicles named "Dozer"

Duplicate that object and name it something like unique, like i have done above the pink arrow (but plz be a bit more creative with our naming)
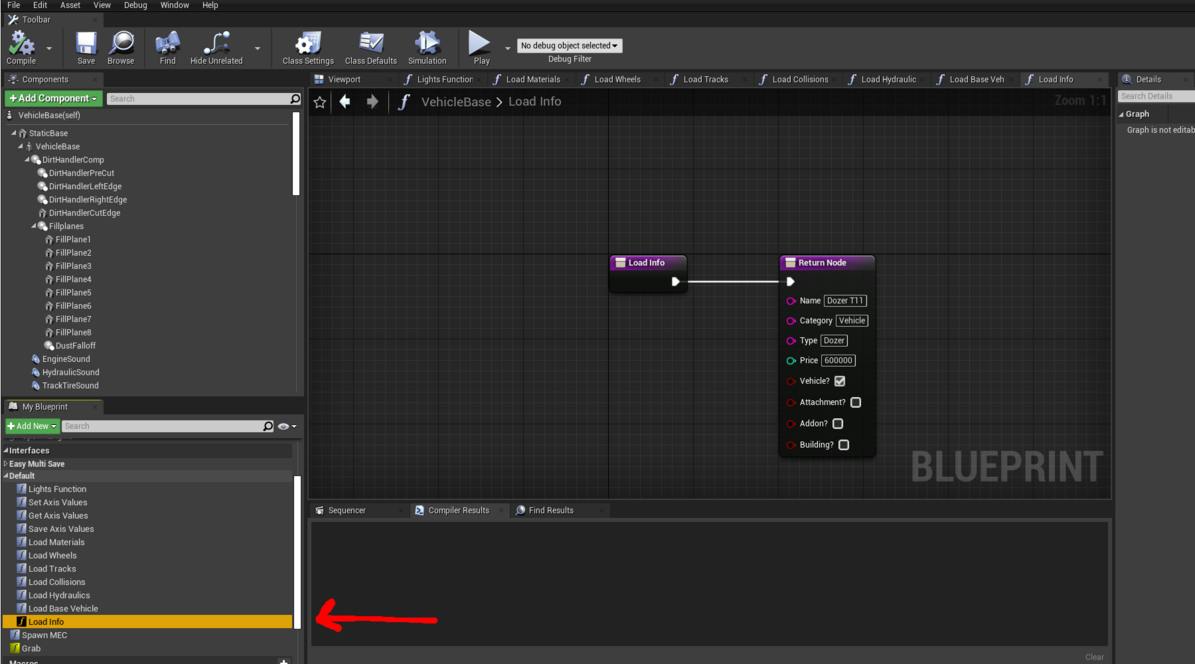
For all mods you need to Edit the "Load Info" Thats the info for the store and help texts, The price is in USD the diffent Categories and Types are listed below this pic
Categories
- Vehicle
- Tool
- Building
- Part
- Misc
Types
- Dozer
- Excavator
- Loader
- Semitruck
- Pickuptruck
- Grader
- Crusher
- Dumper
Building object
In this you can add any static mesh you can think of or build,
you can also add in any effects or stuff as children to the "Build object" but always turn off collsions and never add any Collsions
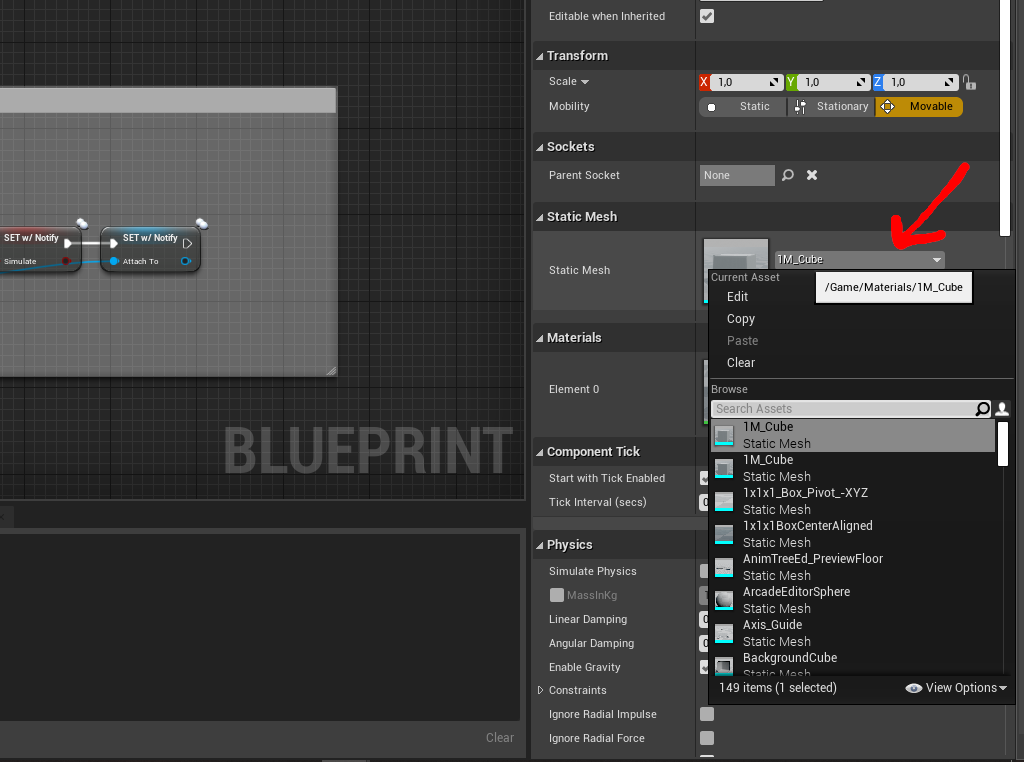
Press the dropdown and select your mesh
Vehicle
Swap out the Vehicle base to your own skeletal mesh or keep it empty if the vehicle has no Skeletal mesh

Press "
Vehicle Base" so you can swap out the mesh, then change to the
Animation Blueprint (AnimBP) you made for the mesh

Then in the
Event graph you need to Drag out the
"Return Value" right click and search for
"Cast to YOUR MESH_SKELETON_ANIMBP" then you can drag out from that node and search for the
variables you made in the AnimBP, You want to find the
"Out" variable that matches the
input you want, "
GET" the out variable that fits and connect/drag it to "
SET" the variable from the
AnimBP
These are the other infaces that need editing and are vehicle specific
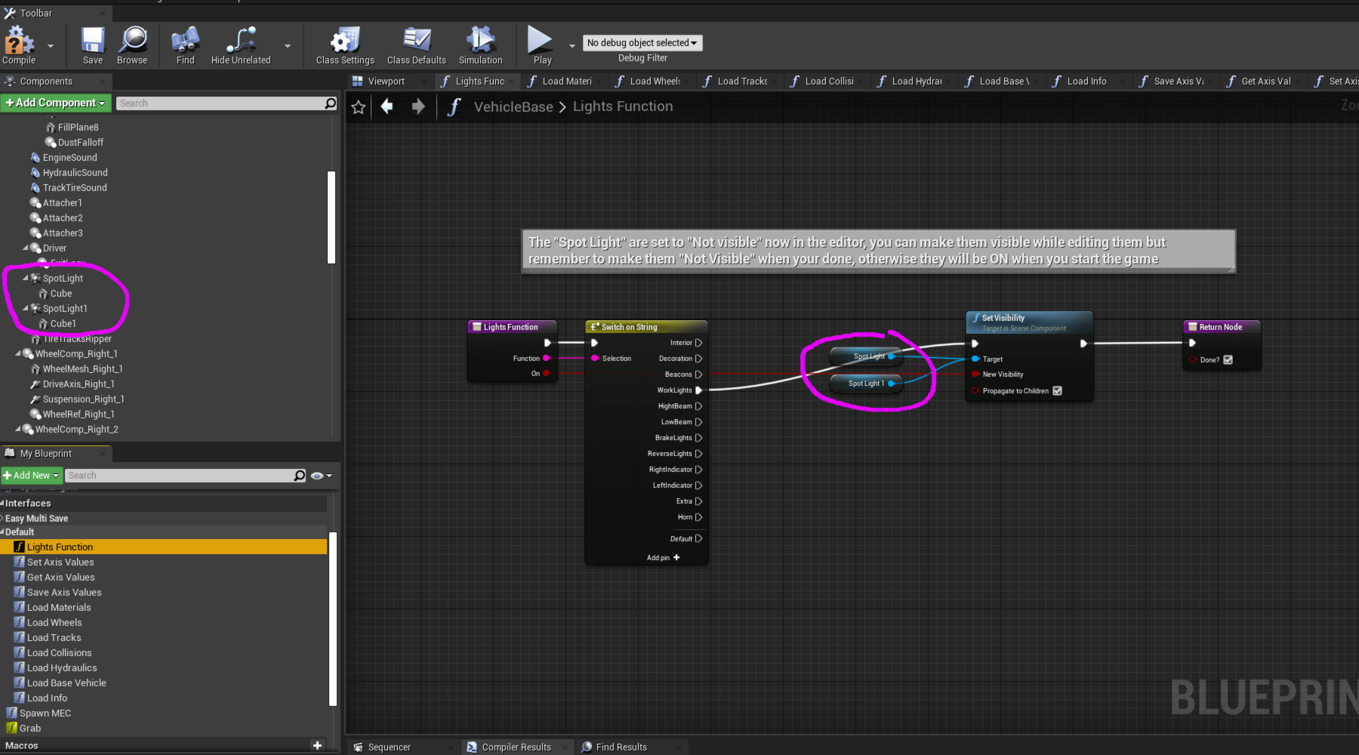
Here you add all the lights you want as standard equipment, Just copy the
"Set visibility" node and connect it to the Light references. All lights are just
static meshes with a super bright material and a
Spotlight that you make visible when turning on the light

Here you add all the material refrences you want to be "Dynamic", that means have the ablity to paint, wear and get dirty, Just drag in your mesh ref, Connect it, set your Material Element index and the Paint index
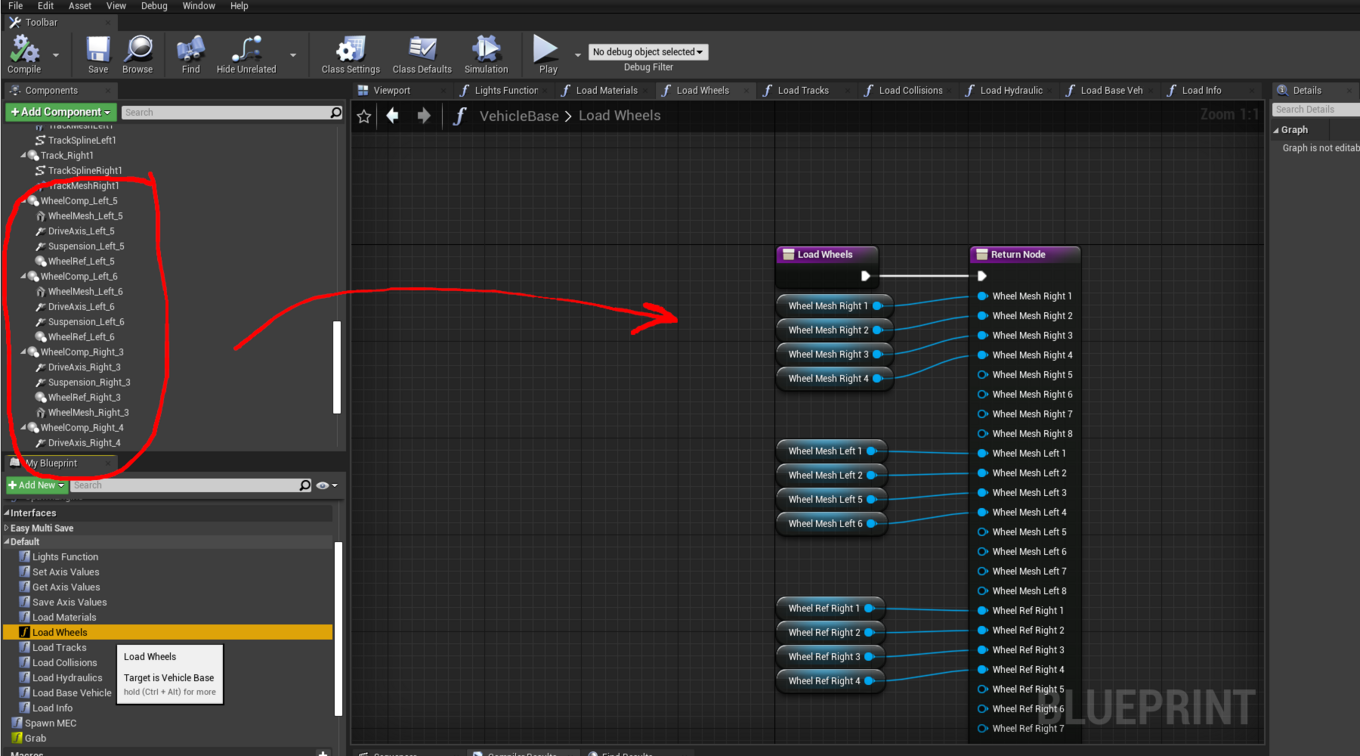
For each wheel there need to be a "WheelComp" with its 4 children (Move the WheelComp and NOT the Children) Add/Delete those as you want and then just connect the refs, you can have 8 wheels on each side of the vehicle
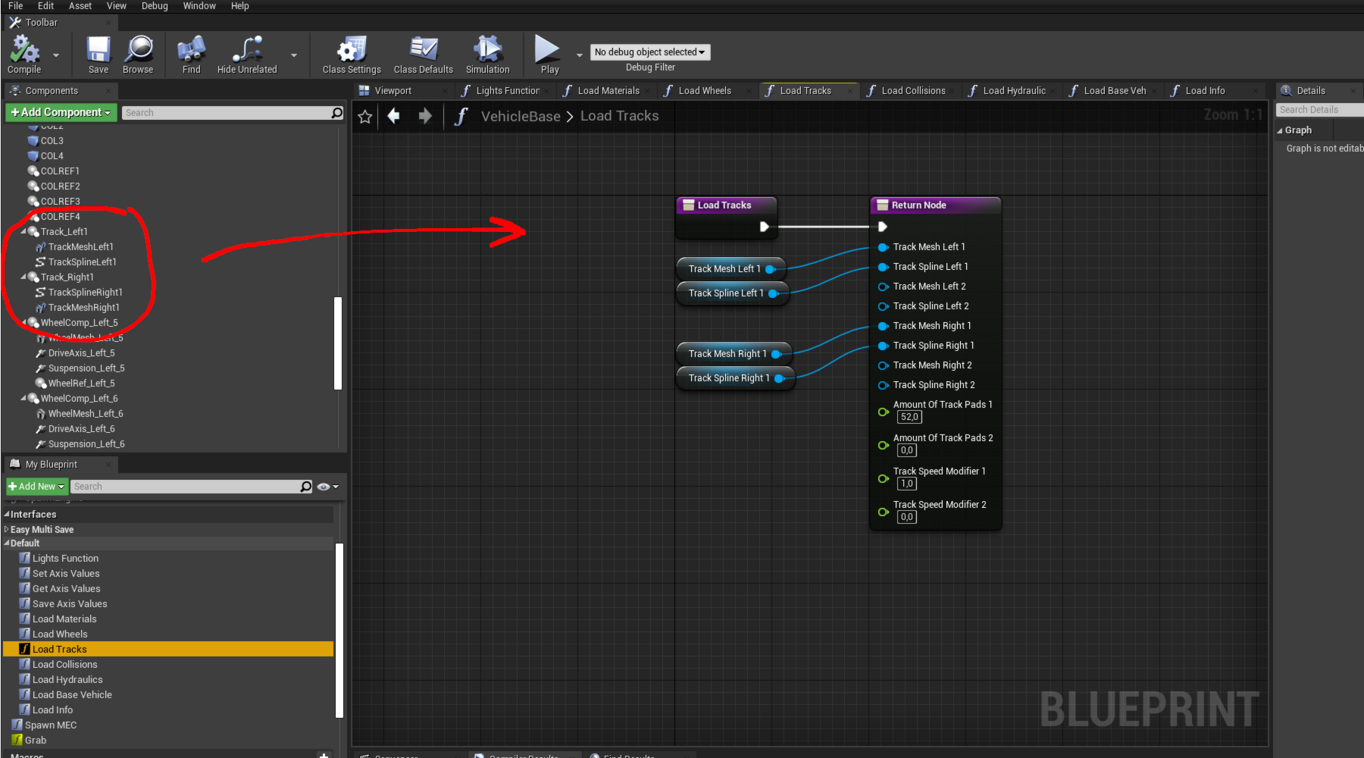
Edit the splines to fit your need and Swap to your Trackmesh (one trackpad) Then you can edit the amount of trackpads and the Speed if thats needs any tweaking, You can have 4 tracks in total
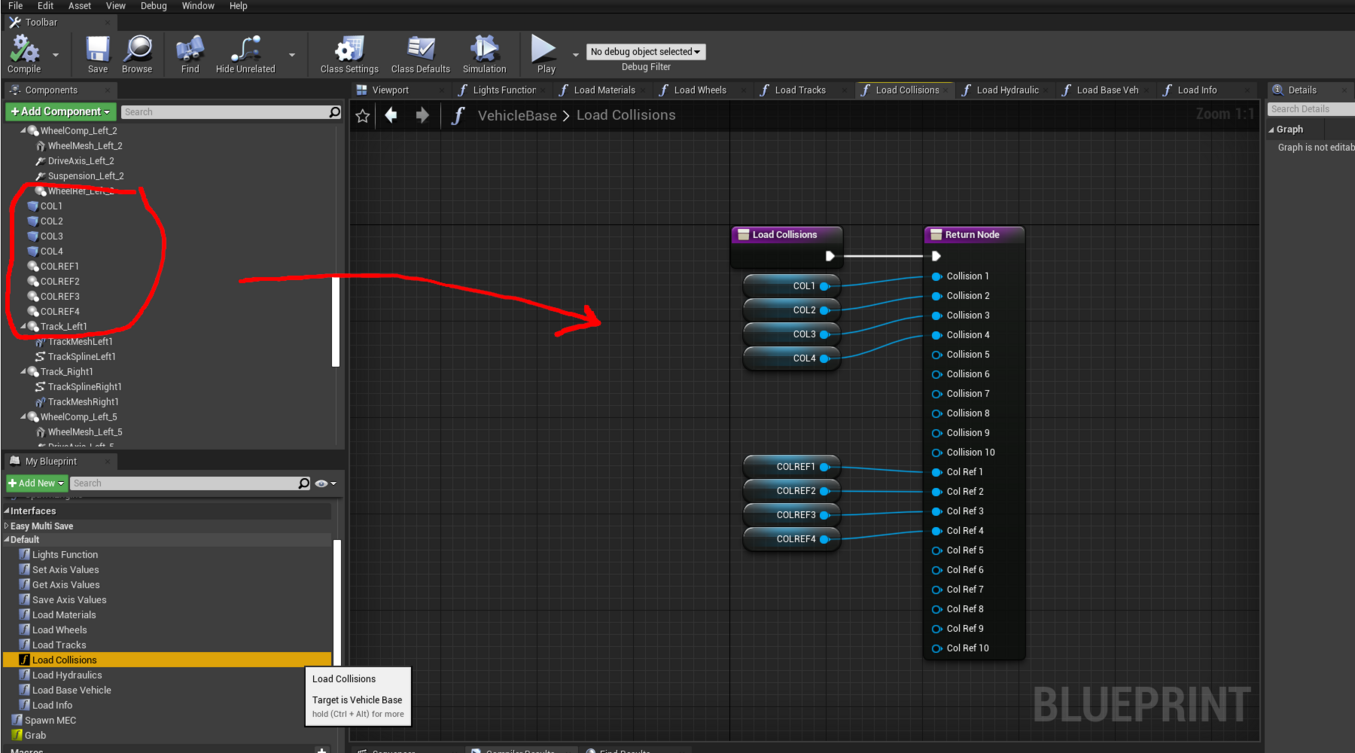
Add or remove collsions as you need and drag in and connect the refs,
Collsions and the COLREFs needs to have the location and rotation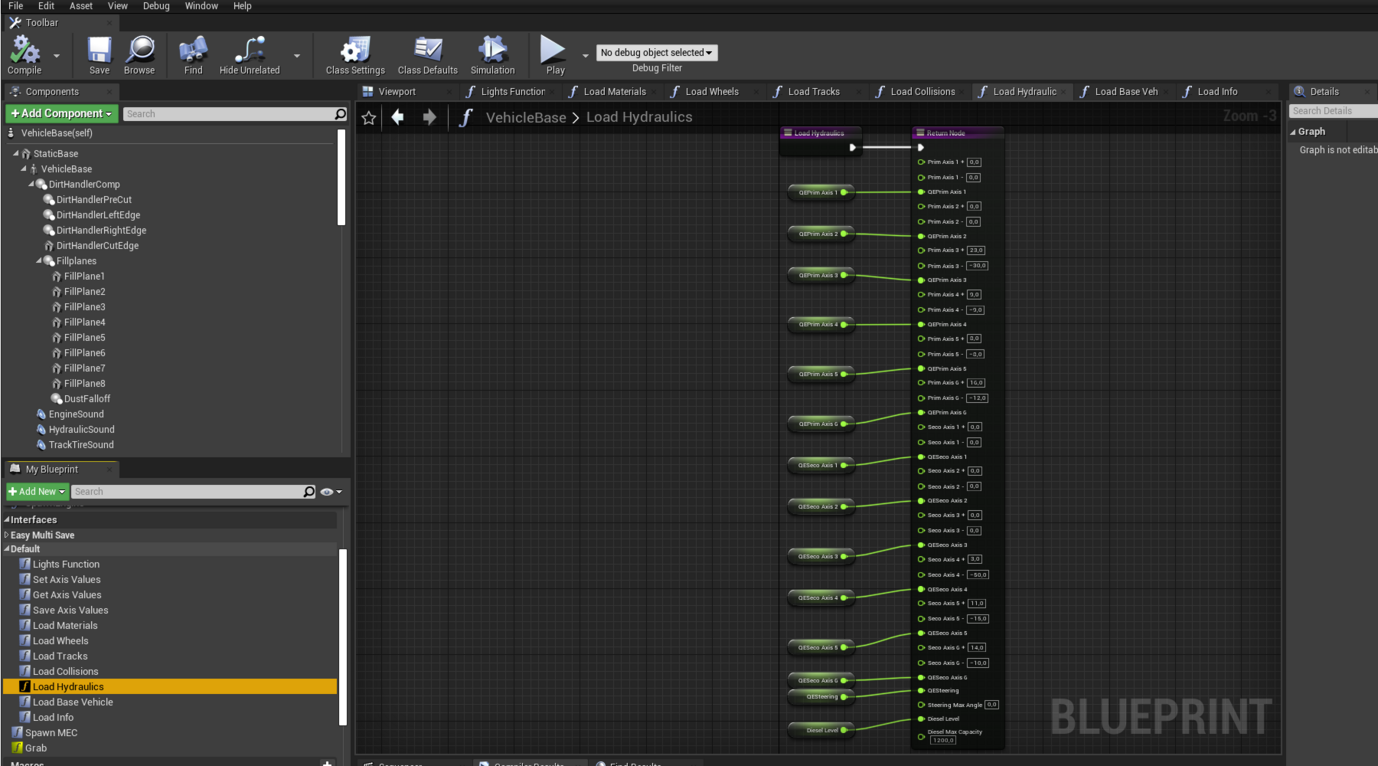
Here you just enter the
Hydraulic limits for each axis, you only need to edit the ones your using in the "
Event Graph" and
Diesel Max Capacity and
Steering Max Angle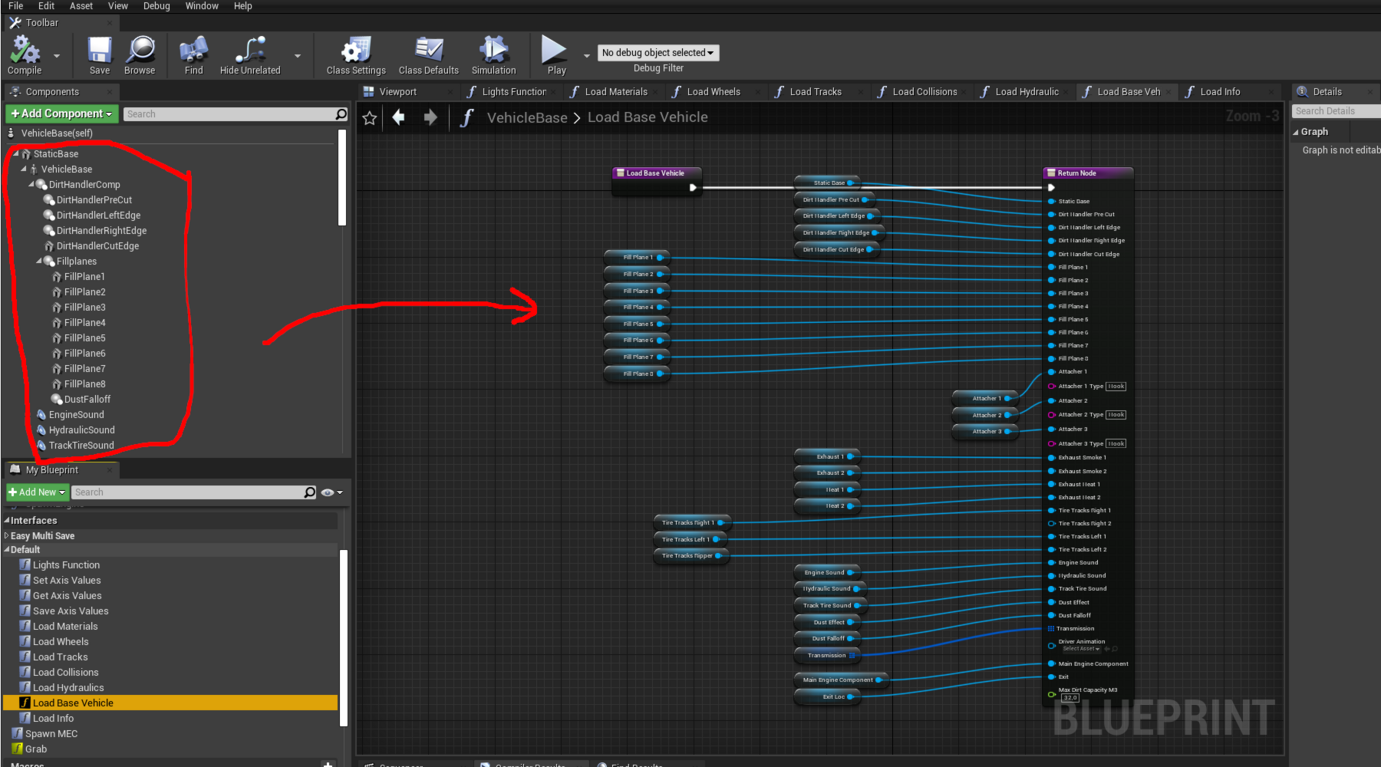
Here you add in all the other Refs, Remember to edit the
Transmission Array and the
Dirt Max Capacity if its a Dirt moving thing
Vehicle Addon
Start by duplicating the example Vehicle addon
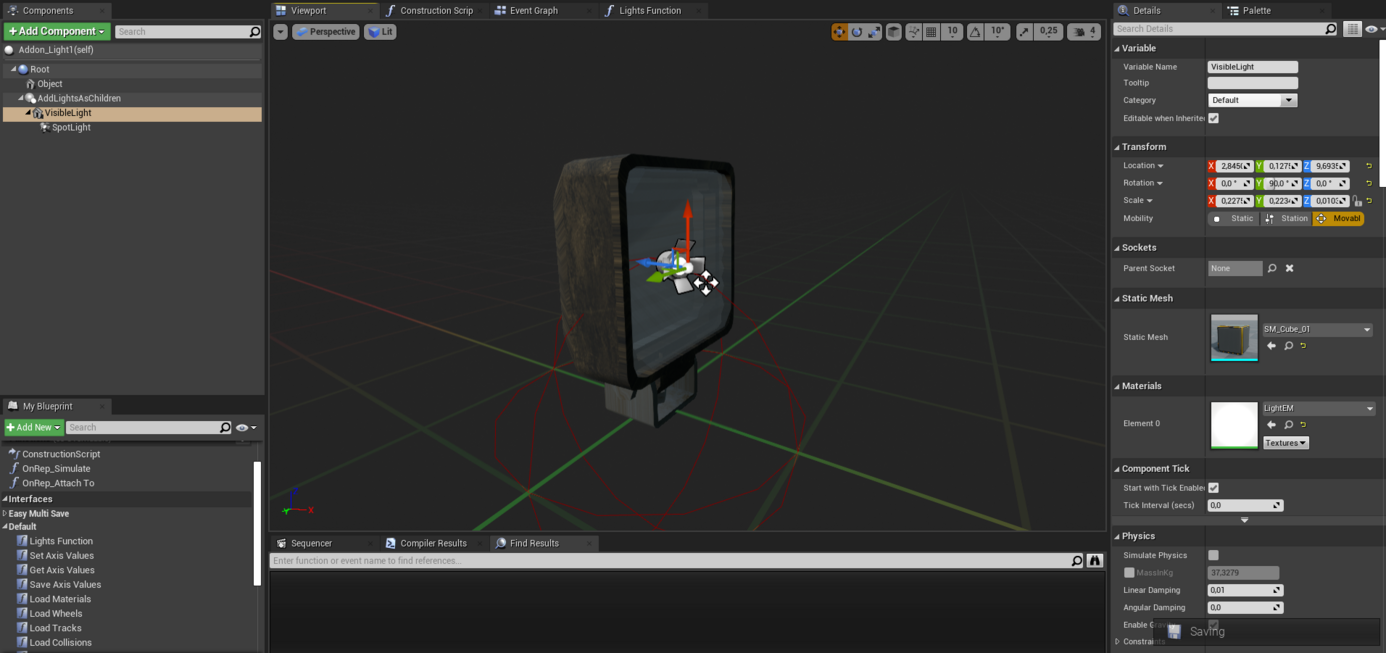
This is a simple thing to make, Swap "
Object" to your mesh and change the shape of the "
VisibleLight" to fit the light and edit the "
Spotlight" to fit your needs.

And add the
Visible light to the function you want it (No need to ad "Spotlight" since that is the child of "VisibleLight" and "
Set Visibility" includes children)
Vehicle Attachment
Start by duplicating the example Vehicle attachment
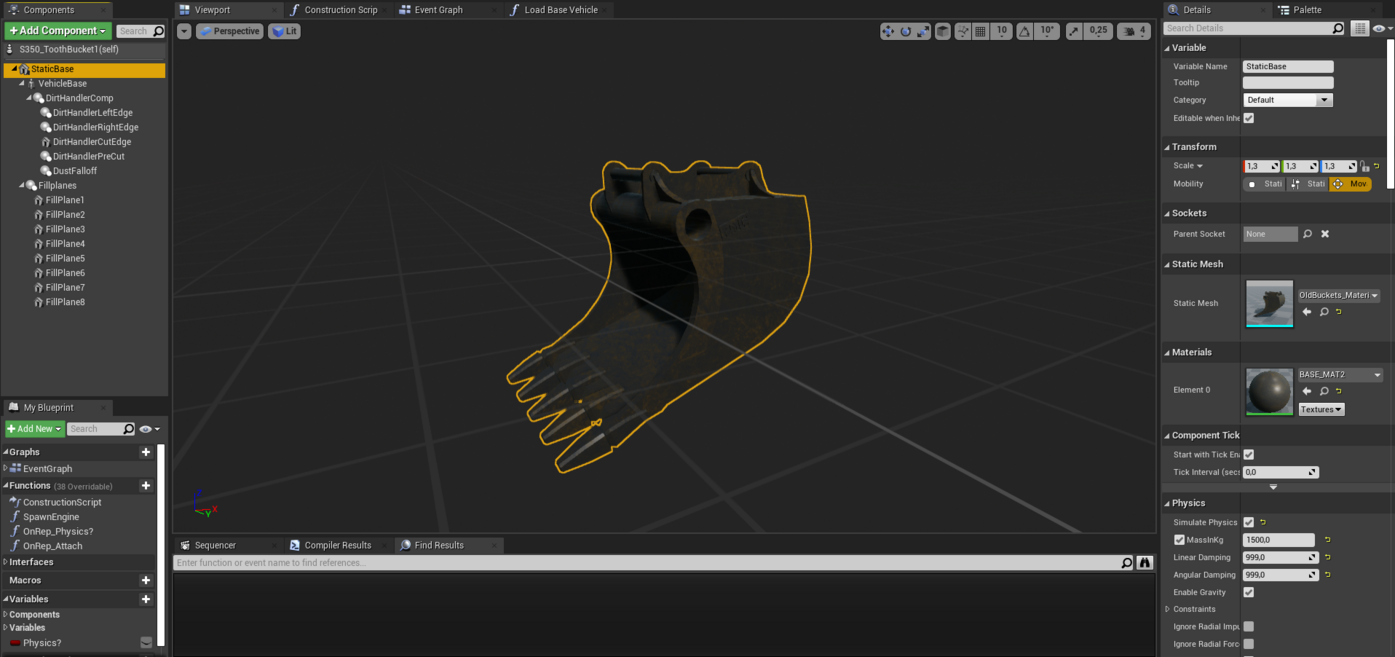
Important to make a somewhat smaller collision for the bucket mesh, Note the
Transform Scale is 1.3x this is becuse we only have one Excavator bucket for every size of machine (only on excavators) so
all excavator buckets should be modeled/ imported after the 330 Buckets (that way you dont have to model one for each size)
Exporting & Uploading
Open the example project and follow the instructions below
Step 1
Step 2
Step 3
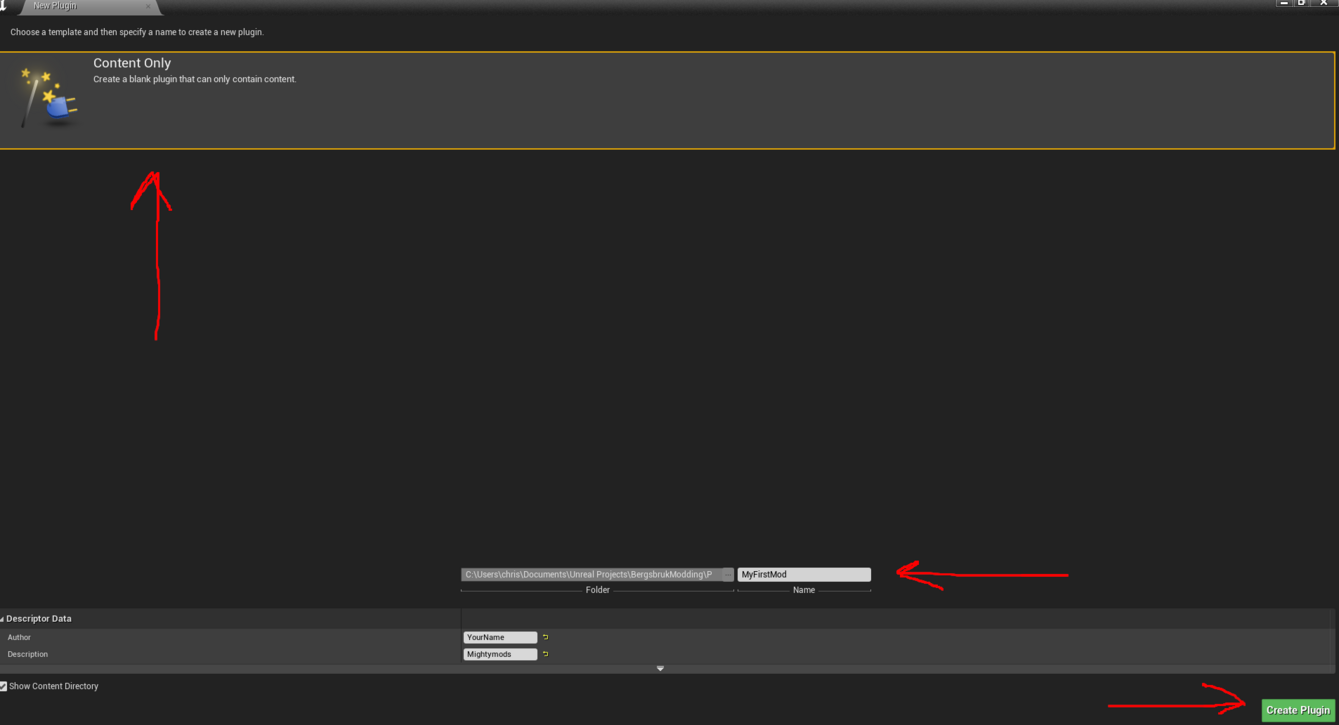
Press "Content Only", then name your mod(Name it something uniqe like "Exavator 560 ModTeam"), enter your Name/alias and Desc and press "Create Plugin"
Step 4
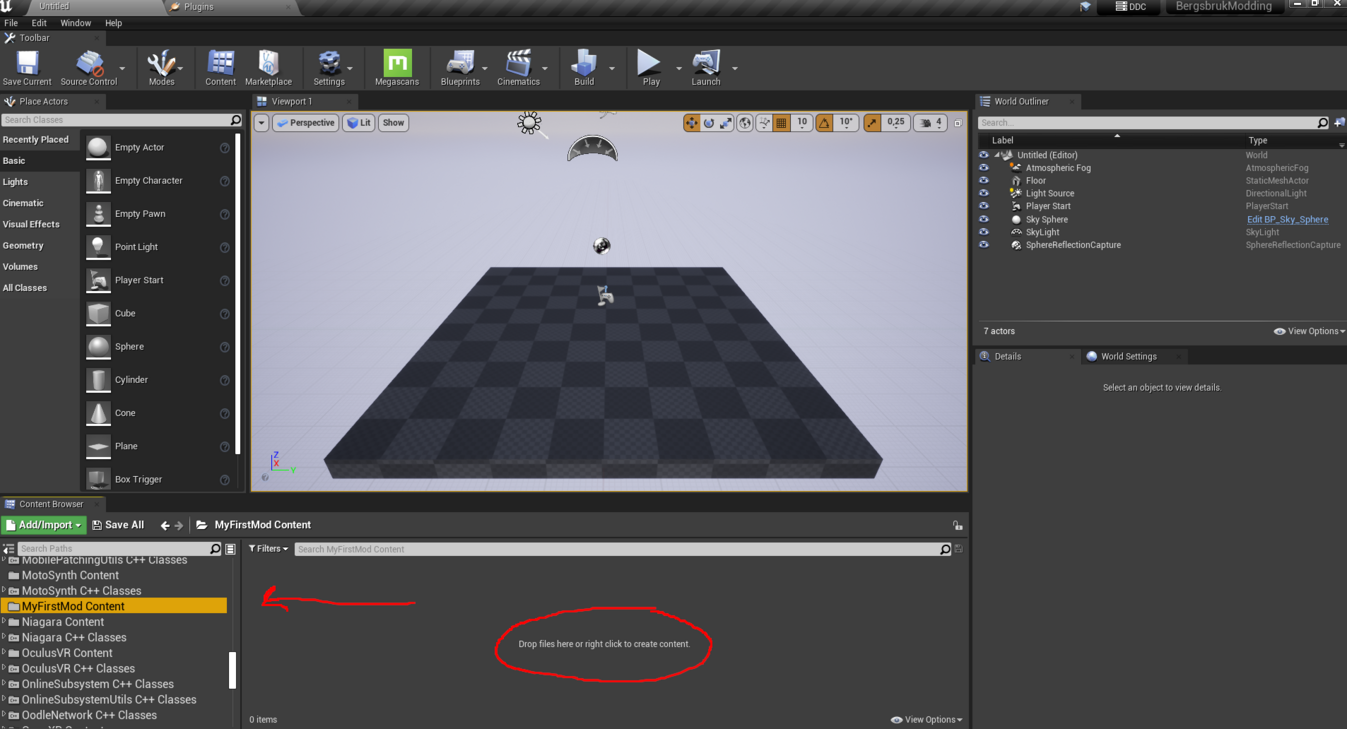
Now you have a new
Content Directory, add all the stuff you want to add here and everything they need like textures and models, sounds etc. You can always scroll up and open the Default Content Directory where the default stuff is and switch between them or drag content between them
Step 5
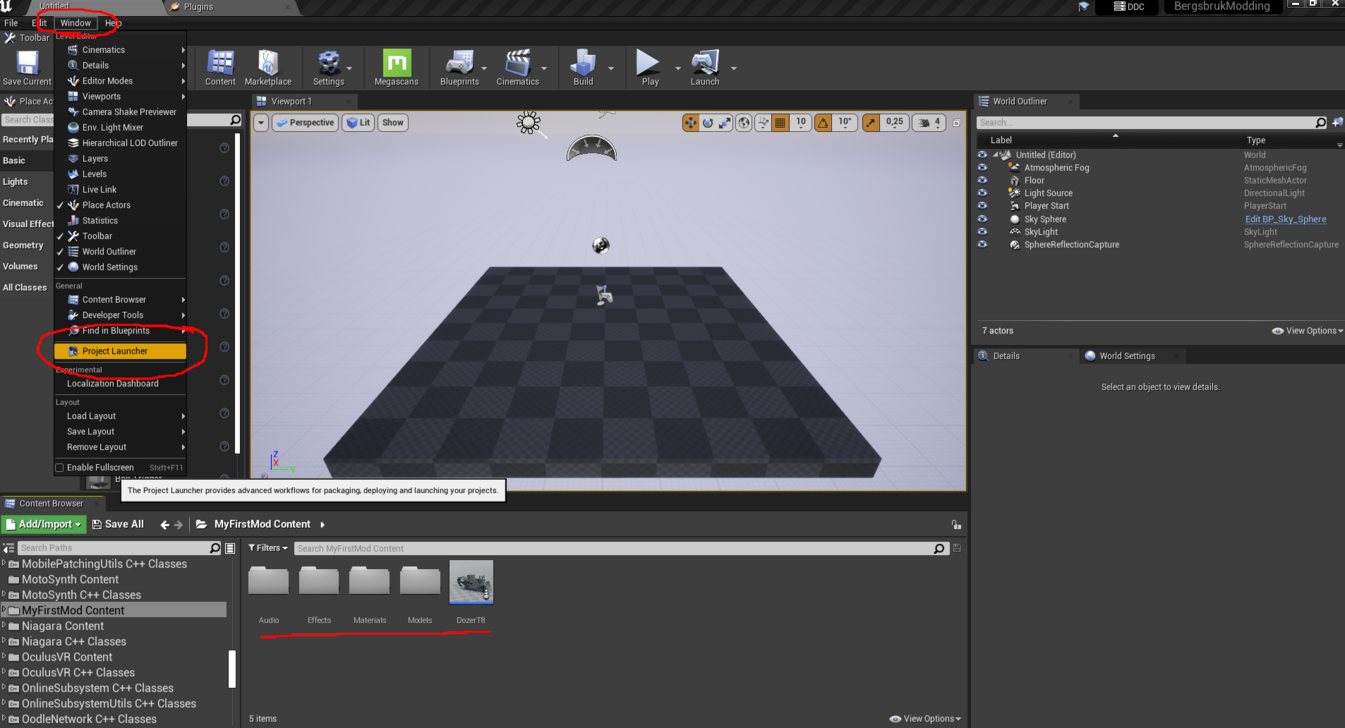
After the content is added and done you open the "Window" & "Project Launcher"
Step 6
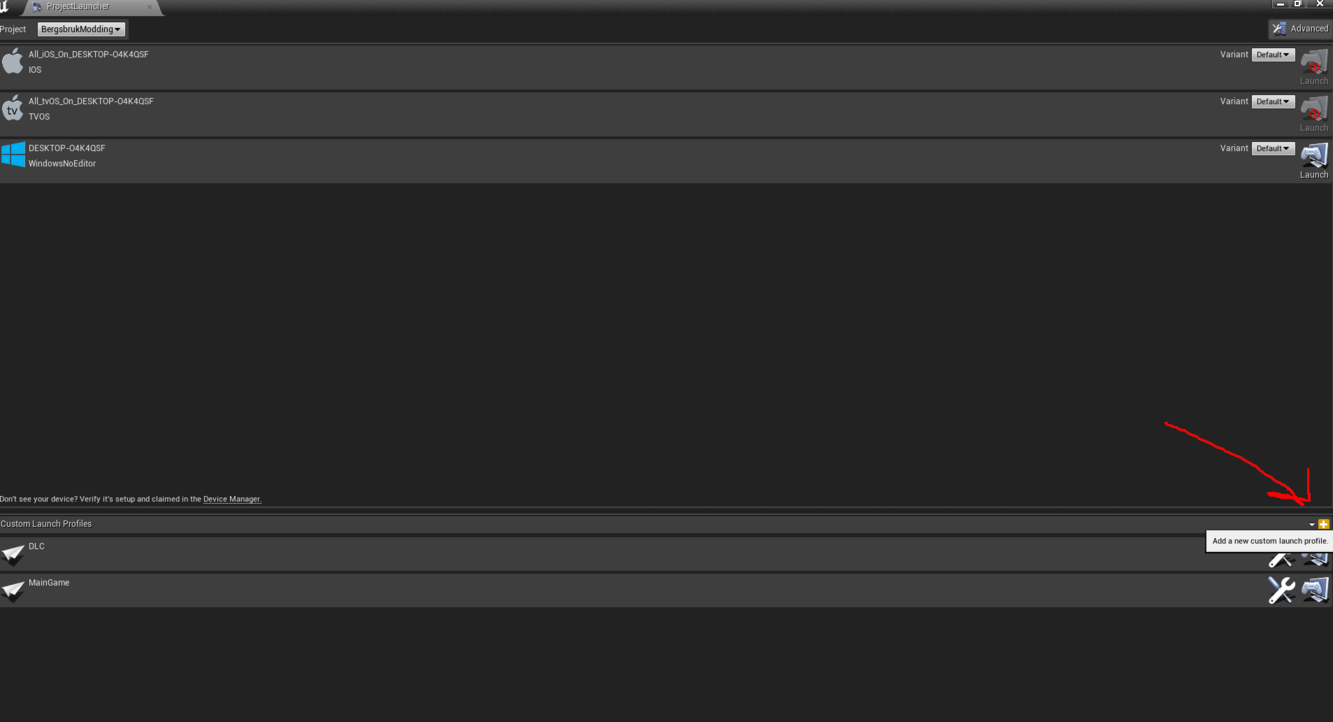
When doing this for the first time we need to create 2 launch profiles, one for maingame and one for DLC (Both are need to pack the mod) Press the Orange + to add a new profile
Step 7
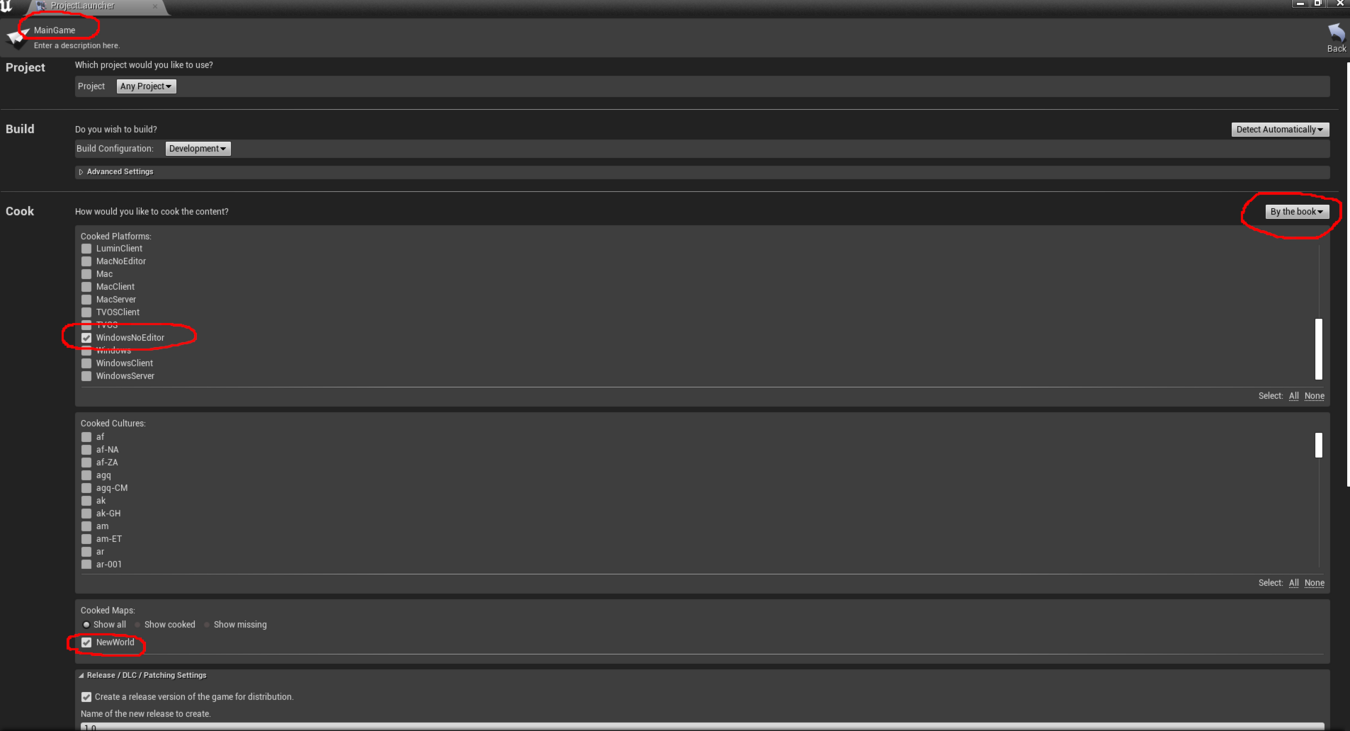
Name the Launch profile something like "MainGame" & check/set so the red ringed settings match
Step 8
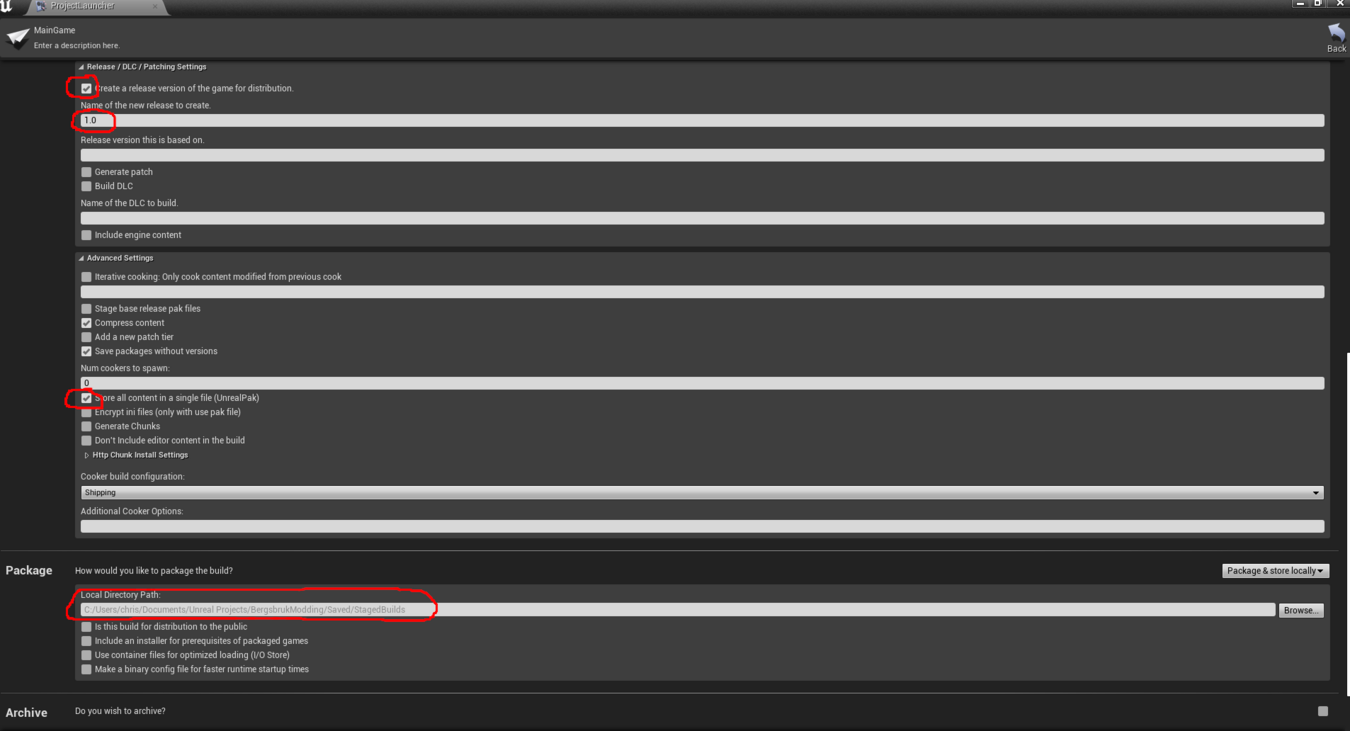
check/set so the red ringed settings match and if you want
you can set a custom "Local Directory Path" but
i would recommed leaving that at defaultStep 9
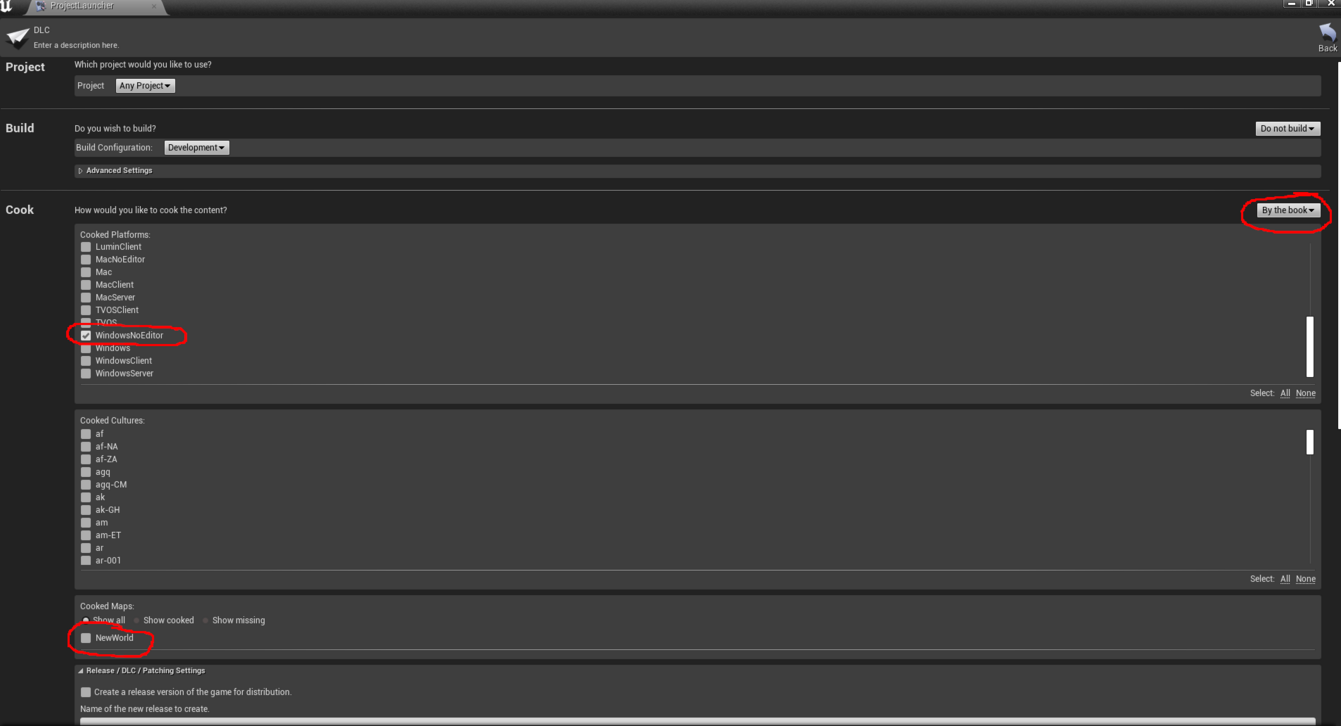
check/set so the red ringed settings match
Step 10
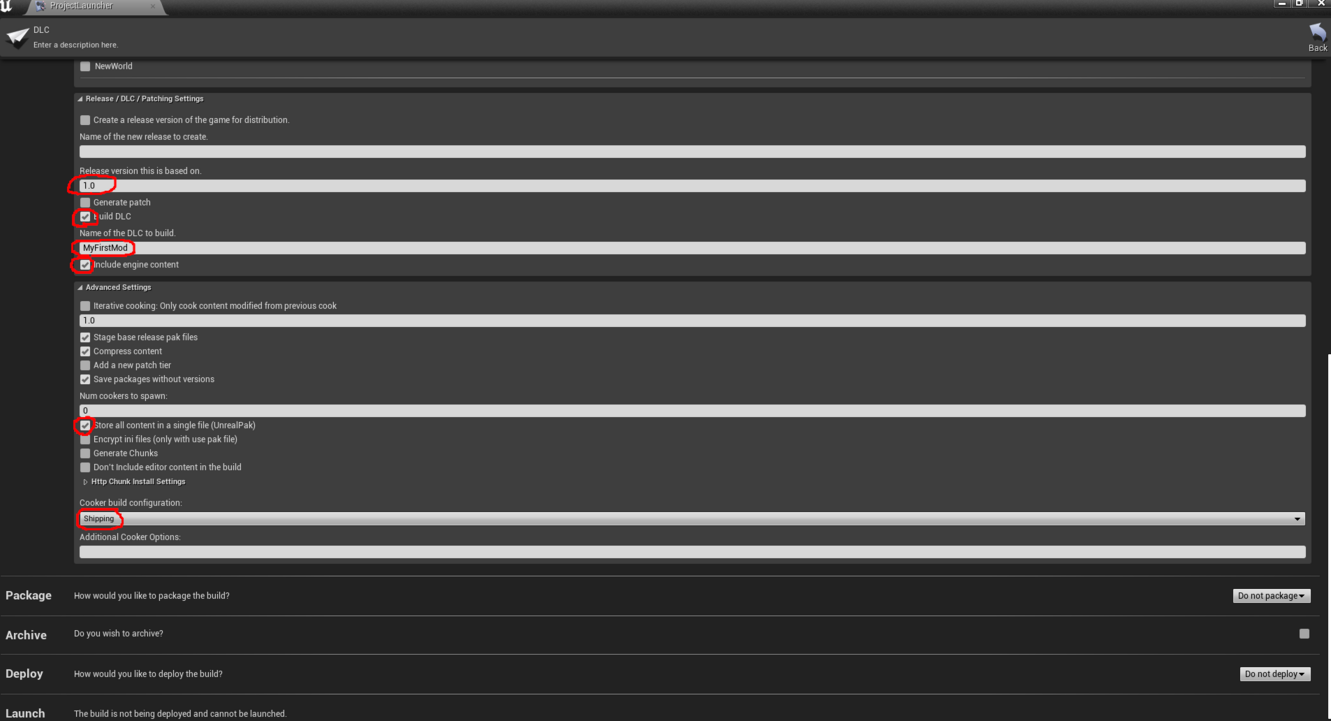
Set the Version to 1.0,
set the "Name of the DLC to build" to the same as the DLC Name in Step 3 and check so the rest of the red ringed settings match
Step 11
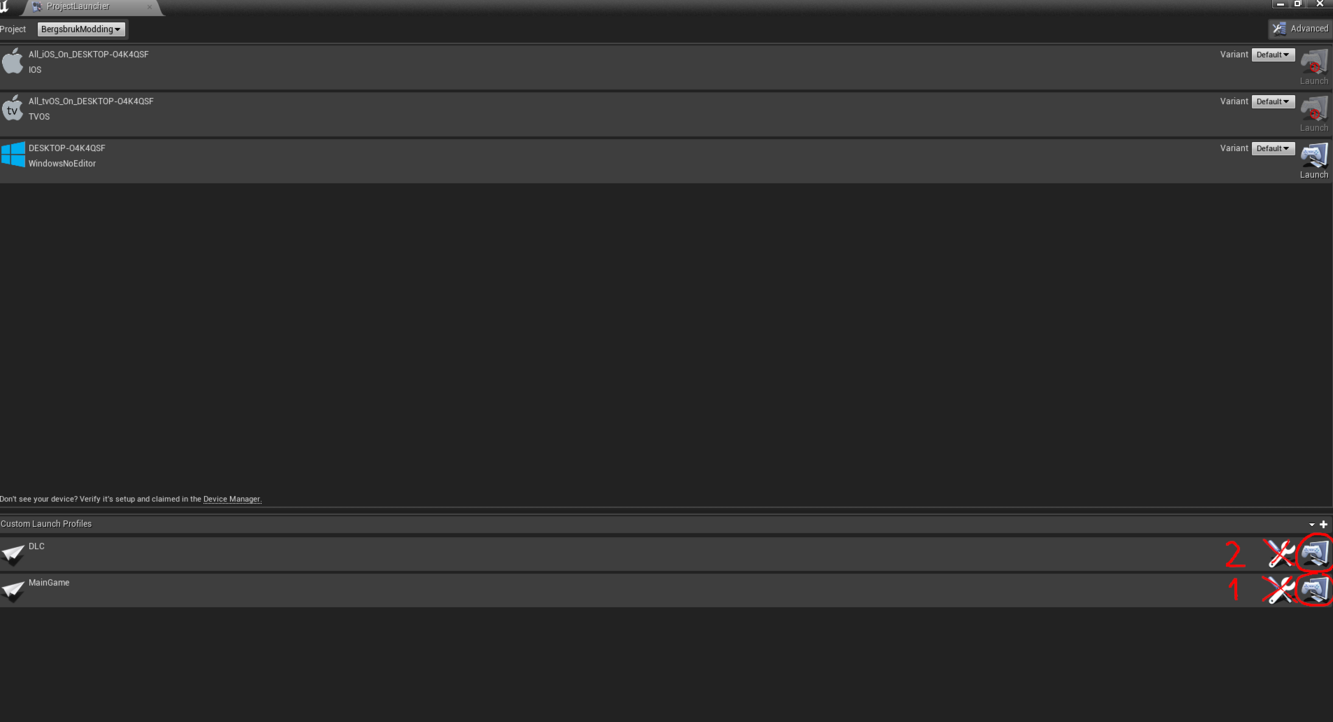
Launch the MainGame profile first & then Launch the DLC
Step 12
The mod .pak file will be this directory:
C:\Users\X\Documents\UnrealProjects\TestProject\Plugins\TestDLC\Saved\StagedBuilds\WindowsNoEditor\TestProject\Plugins\TestDLC\Content\Paks\WindowsNoEditor\TestDLCTestProject-WindowsNoEditor.pak
Or if you specified something else it will be there
Step 13
Then grab the .pak and rename it to what you put in "Name of the DLC to build" MyFirstMod in this example, put it in a zip file and upload it to https://bergsbruk.mod.io/
Your done! Congratulations to your first mod!
Other Tutorials
If your new to blender we recomend watching this series to learn blender:
Texturing in Blender
Fixing import issues Unreal


